Drilling into plasterboard may seem straightforward, but choosing the wrong drill bit can quickly result in crumbling walls, loose fixtures, or wasted time and materials. Whether you’re mounting shelves, hanging art, or installing electrical fittings, the right bit makes all the difference between a clean job and a frustrating repair.
With so many bit types available, from twist drills to spade bits and specialty drywall anchors, it’s easy to get lost in hardware store aisles or online product listings.
This comprehensive guide demystifies the process, focusing on what drill bit for plasterboard is truly best for each use case. We’ll explore the science behind plasterboard’s composition, compare bit materials and geometries, and present real-world advice drawn from professional tradespeople and DIYers. You’ll learn which bits to avoid, how to prevent damage, and the safest, most efficient techniques for every project. Get ready to master your next plasterboard drilling task with confidence, precision, and professional results.
Key Takeaways
- Plasterboard is fragile: Selecting the proper drill bit prevents cracks, crumbling, and reduced wall integrity.
- Carbide-tipped and high-speed steel bits are top choices for clean, efficient holes in plasterboard.
- Anchor compatibility is critical: Match your drill bit size and type to the wall anchor or fixing you plan to use.
- Standard wood, masonry, and multipurpose bits each have pros and cons, understand when and how to use each.
- Proper drilling technique, including low speed, steady pressure, and pilot holes, reduces wall damage.
- Real-world examples show the difference the right bit makes for shelving, electrical work, and heavy-duty mounts.
Understanding Plasterboard: Composition And Drilling Challenges
Before choosing a drill bit, it’s essential to understand why plasterboard (drywall or gypsum board) behaves differently from wood, brick, or concrete. Plasterboard consists of a gypsum core sandwiched between heavy paper facings. This structure makes it lightweight and easy to cut but also highly susceptible to chipping, crumbling, and blowouts when drilled improperly.
Physical Properties Of Plasterboard
- Gypsum core: Soft, brittle, and non-fibrous, making clean holes difficult with aggressive bits.
- Paper facing: Provides some structural integrity but is easily torn.
- Thickness: Standard residential plasterboard is 12.5mm (1/2 inch); commercial variants range from 9.5mm to 15mm.
Common Drilling Issues
- Blowouts: Occur when the bit tears the back paper, leaving a messy hole.
- Cracking: Excessive pressure or dull bits cause surface cracks.
- Anchor failure: Using the wrong bit size or type can prevent anchors from gripping, leading to loose fixtures.
Why Standard Bits Often Fail
Bits designed for wood or metal can be too aggressive, while masonry bits may simply grind or tear the soft gypsum. The ideal bit for plasterboard should cut cleanly, minimize vibration, and match anchor requirements, a delicate balance that requires understanding both the material and the task.

Credit: www.youtube.com
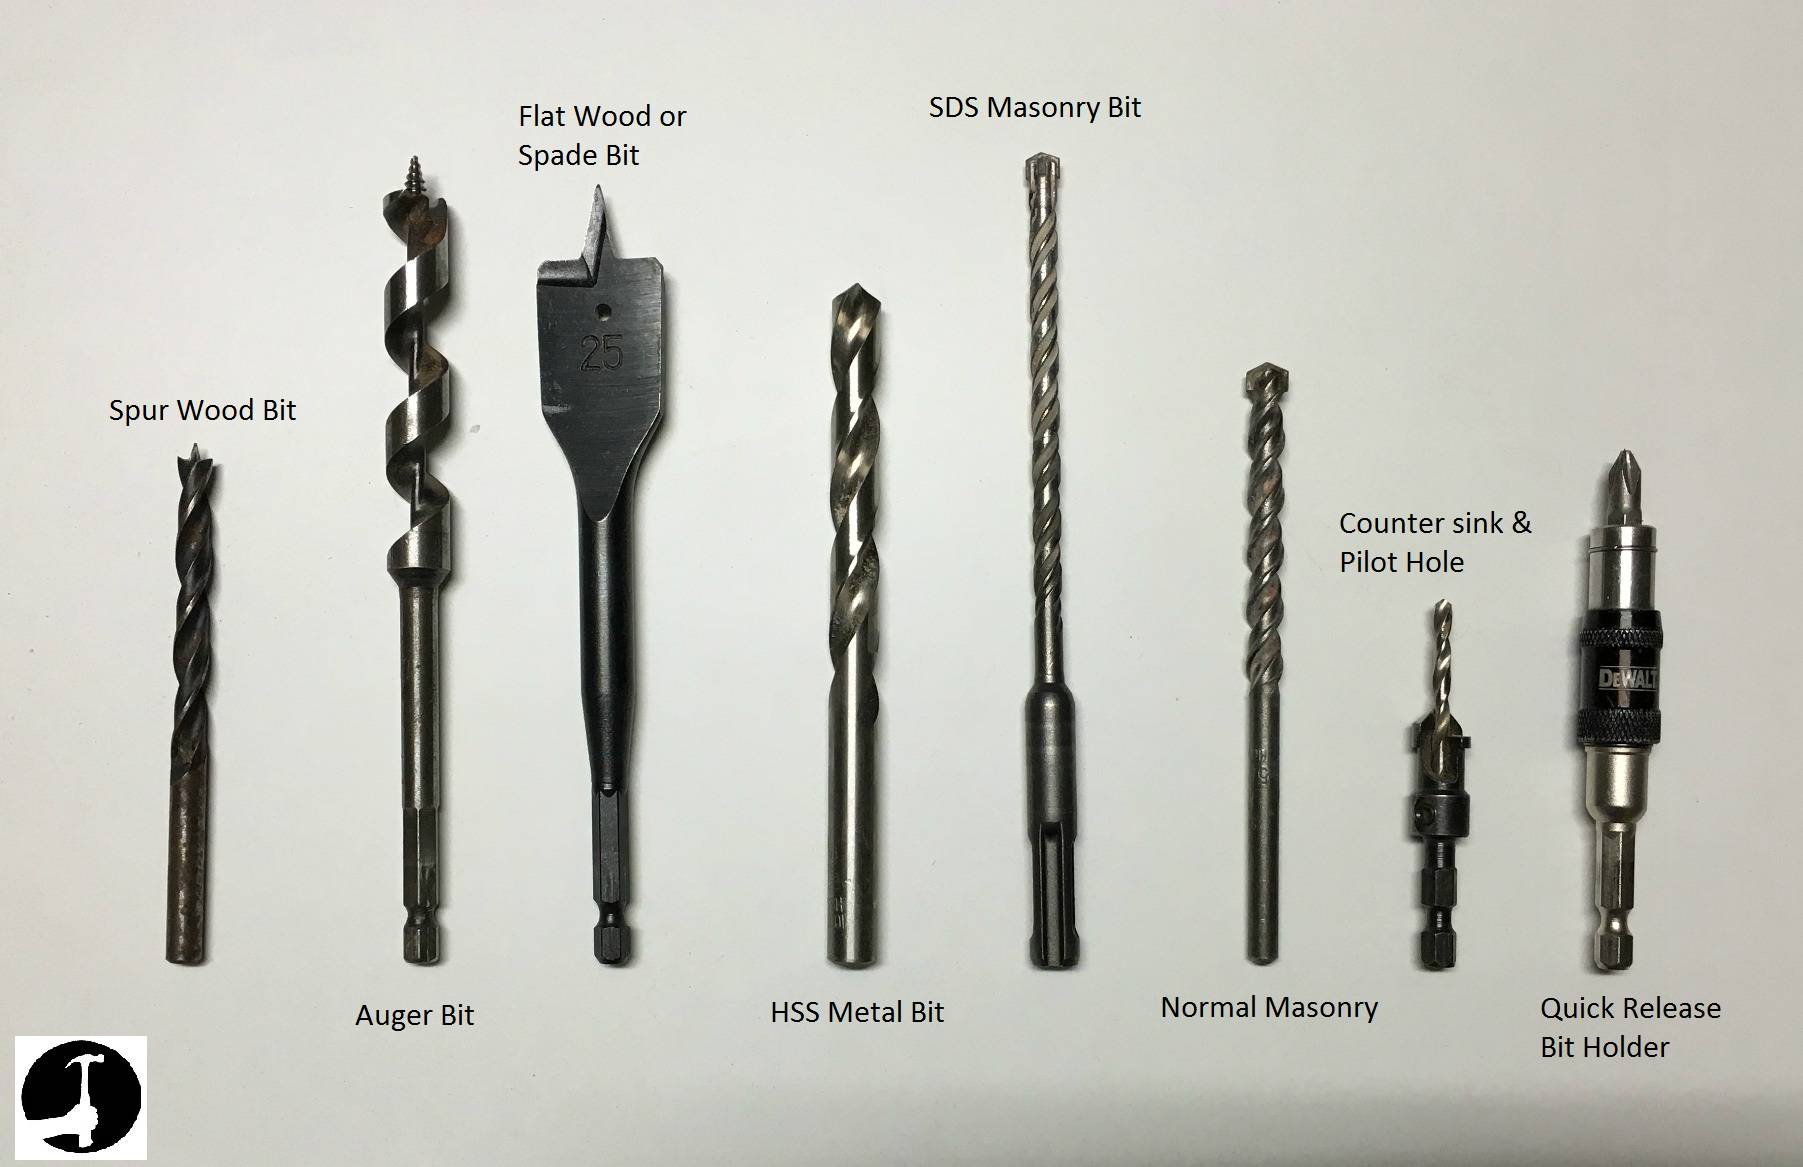
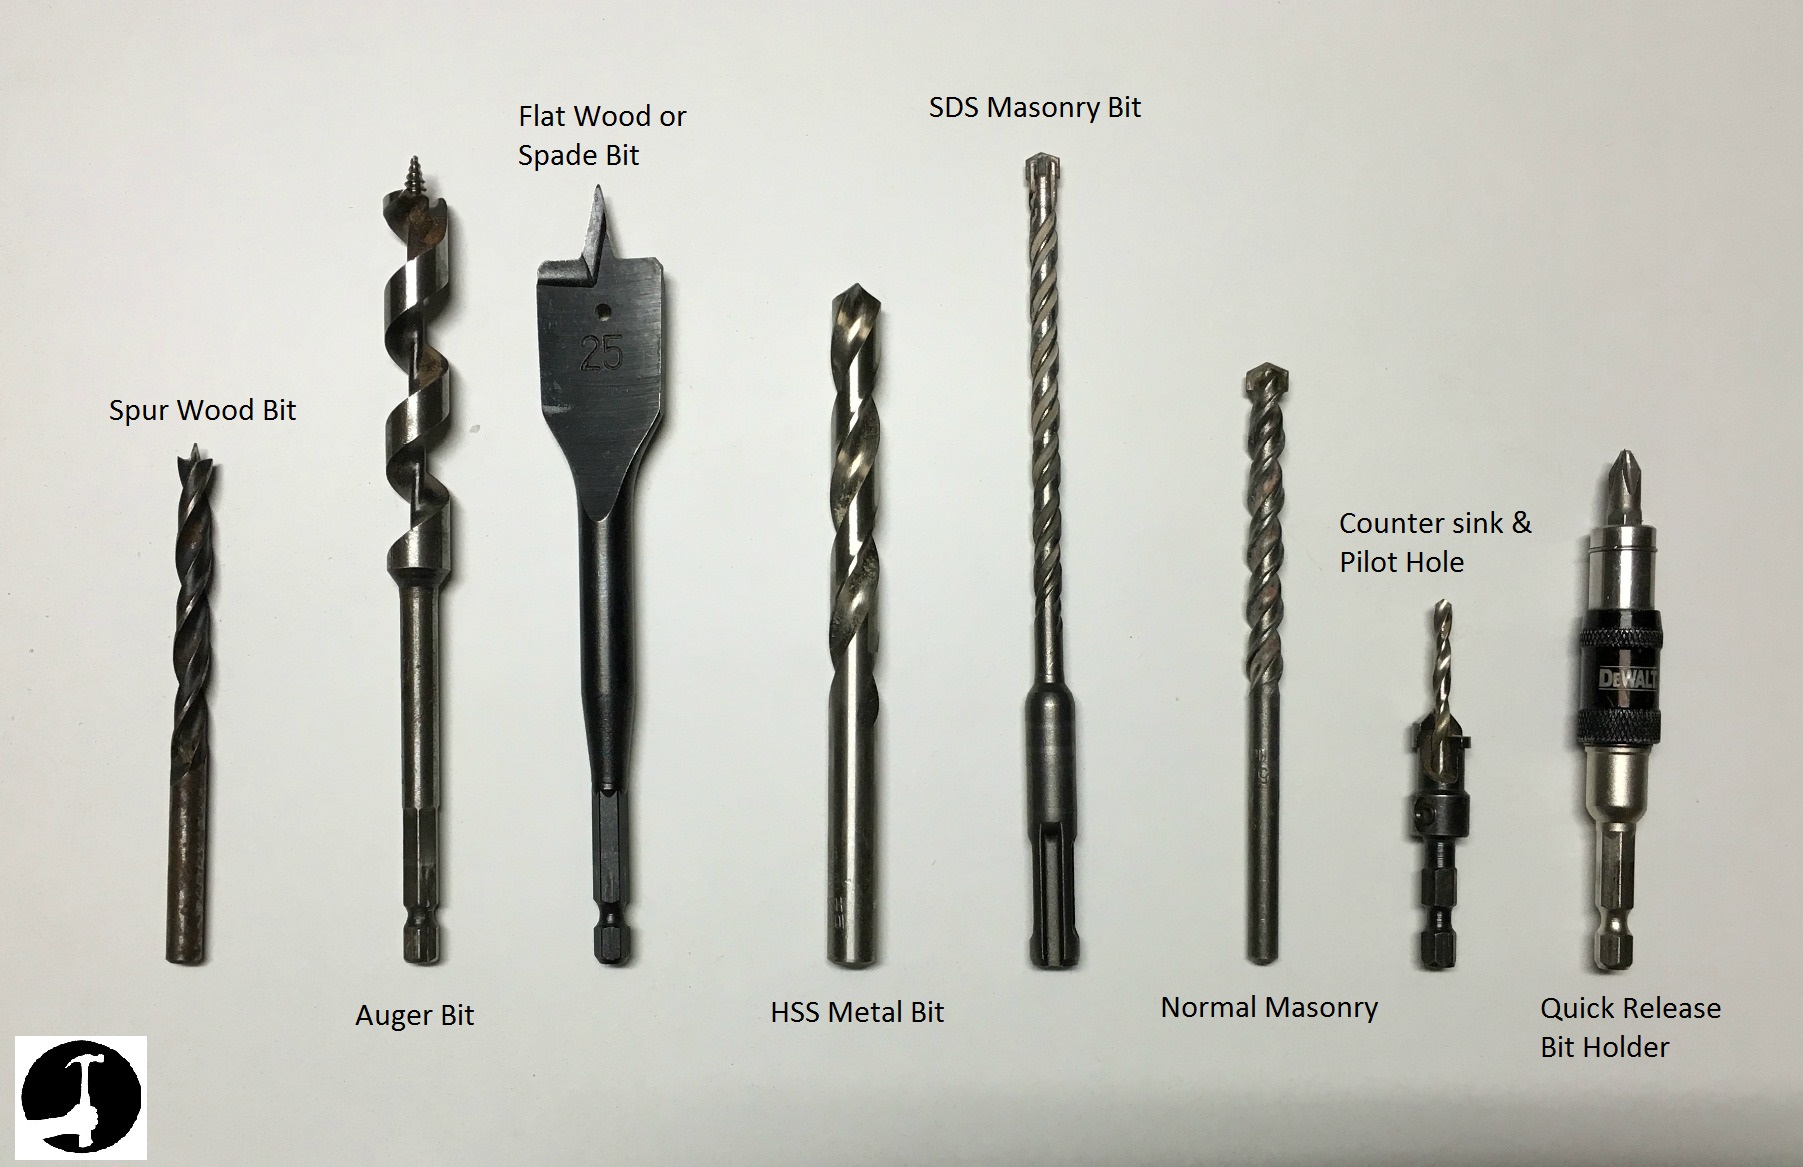
Drill Bit Types For Plasterboard: A Detailed Comparison
With a clear grasp of plasterboard’s properties, let’s examine the most commonly used drill bits, their construction, and suitability. Choosing the right bit is crucial for both the hole’s quality and the longevity of your wall and fixtures.
Twist Drill Bits
Twist drill bits are the most familiar and versatile. Made from high-speed steel (HSS) or carbon steel, their spiral flutes efficiently remove debris.
- Best for: Small pilot holes, pre-drilling for wall anchors.
- Pros: Readily available, affordable, good control.
- Cons: Can cause tearing if used at high speed or with excessive pressure.
Masonry Drill Bits
Masonry bits have a blunt, carbide-tipped end designed to grind rather than cut.
- Best for: Plasterboard over masonry or brick (dot and dab walls), or when drilling through to a solid substrate.
- Pros: Durable tip, effective for mixed substrates.
- Cons: Too aggressive for standalone plasterboard, often causes chipping.
Spade Bits
Spade bits are flat with two sharp cutting edges.
- Best for: Large holes for pipes or cables.
- Pros: Fast cutting, ideal for wide openings.
- Cons: Can be rough; prone to tearing the back paper unless used with care.
Hole Saws
Hole saws are circular blades used for large-diameter holes.
- Best for: Recessed lighting, vent openings.
- Pros: Clean, uniform holes for large fixtures.
- Cons: Require a pilot bit; can snag if not properly aligned.
Multipurpose Or Multi-material Bits
These hybrid bits feature special geometries and coatings to handle various materials.
- Best for: Users needing one bit for wood, plasterboard, and light masonry.
- Pros: Versatile, reduces bit changes.
- Cons: Not always optimized for plasterboard alone; performance varies by brand.
Carbide-tipped Bits
Carbide-tipped bits provide superior sharpness and wear resistance.
- Best for: Frequent drilling or professional settings.
- Pros: Last longer, stay sharper, minimize wall damage.
- Cons: More expensive, sometimes overkill for simple tasks.
Comparison Table: Drill Bit Types For Plasterboard
| Drill Bit Type | Ideal Use | Typical Size Range | Pros | Cons |
|---|---|---|---|---|
| Twist Bit (HSS) | Pilot holes, small anchors | 1/16″, 1/2″ | Clean holes, easy control | Can tear paper if misused |
| Masonry Bit | Dot & dab walls, mixed substrates | 1/8″, 3/4″ | Durable, handles brickwork | Rough on pure plasterboard |
| Spade Bit | Large holes (cables, pipes) | 1/4″, 1-1/2″ | Fast cutting, large diameter | Can cause blowout |
| Hole Saw | Very large holes (fixtures) | 3/4″, 6″ | Clean, uniform holes | Needs pilot; risk of snagging |
| Multi-Material | All-purpose drilling | 1/8″, 1/2″ | Versatile, convenient | Not always optimal |
| Carbide-Tipped | Frequent/professional use | 1/8″, 1/2″ | Extremely durable, precise | Higher cost |
Credit: www.carpentry-tips-and-tricks.com
Selecting The Right Bit For Your Project
Matching your drill bit not just to plasterboard, but to the fixture and anchor, is vital. Let’s break down the best bit choices for the most common plasterboard projects.
Hanging Lightweight Items (pictures, Small Shelves)
For light fixtures (under 10 lbs), twist drill bits (HSS, 1/8″, 1/4″) are ideal. Pre-drilling a small pilot hole prevents the plasterboard from tearing and helps the wall anchor seat securely. Use a low drill speed and gentle pressure to avoid surface cracks.
Medium-duty Fixings (heavy Shelves, Tv Brackets)
For heavier loads, plastic or metal wall anchors are recommended. Here, a carbide-tipped bit sized exactly to the anchor’s diameter ensures a snug fit. For dot and dab walls (plasterboard over brick), start with a masonry bit to pass through the board and into the masonry, then switch to a wood or multi-material bit as needed.
Large Holes For Utilities (cabling, Plumbing, Lighting)
When making holes 1/2″ or larger, spade bits or hole saws are most effective. Begin with a small pilot hole using a twist bit, then switch to the larger bit. This helps guide the larger bit and keeps the hole clean.
Special Considerations For Dot And Dab Walls
Dot and dab construction involves gluing plasterboard to brick with adhesive blobs. If drilling for a heavy load, you may need to reach the brick behind the plasterboard.
- Start with a masonry bit to penetrate the board and brick.
- Use a longer anchor or a specialized cavity fixing for stability.
Example: Mounting A Bathroom Towel Bar
A user drilled 1/4″ pilot holes with an HSS twist bit, inserted plastic wall anchors, and mounted a towel bar rated for 15 lbs. Despite a heavy hand on the drill, no cracks or blowouts occurred, thanks to the correct bit choice and gentle speed.
Credit: gal-door.co.il
Drill Bit Materials And Coatings: What Matters For Plasterboard
The material and coating of your drill bit significantly influence performance, longevity, and cost-effectiveness, especially when working with delicate plasterboard.
High-speed Steel (hss)
HSS bits are affordable, widely available, and provide a sharp edge for clean cuts in gypsum. They’re suitable for most DIY tasks involving light to medium-duty anchors.
Carbide-tipped Bits
Carbide tips offer superior wear resistance and maintain sharpness over many uses. These bits excel in professional, high-volume settings or when drilling through both plasterboard and masonry. Their higher cost is justified by their longevity and cleaner holes.
Titanium-coated Bits
Bits coated with titanium nitride reduce friction and heat, extending life and improving cut quality. While the benefit is marginal for soft materials like plasterboard, these bits are an excellent all-around choice if you also drill wood or metal.
Black Oxide And Cobalt Bits
While primarily designed for metal, black oxide and cobalt bits can be used for plasterboard in a pinch. However, their aggressive cutting edge may be overkill and increase the risk of wall damage.
Comparison Table: Drill Bit Materials
| Material/Coating | Durability | Ideal For | Cost |
|---|---|---|---|
| High-Speed Steel (HSS) | Good | General DIY, light anchors | Low |
| Carbide-Tipped | Excellent | Frequent/pro use, masonry | High |
| Titanium-Coated | Very Good | Multi-material tasks | Medium |
| Black Oxide | Good | Metal, occasional drywall | Low/Medium |
| Cobalt | Excellent | Metal, rarely drywall | High |
Sizing And Matching Drill Bits To Wall Anchors
One of the most common mistakes is using a drill bit that’s too large or too small for the intended wall anchor. This can result in loose fixings or cracked plasterboard.
Understanding Anchor Types
- Plastic wall plugs: Expand in the hole to grip the gypsum. Require a hole matching the plug’s outer diameter.
- Metal self-drill anchors: Screw directly into the plasterboard with no pre-drilling required.
- Toggle bolts and spring toggles: Used for heavier loads; require larger holes.
How To Choose The Right Size
- Consult anchor packaging: Most manufacturers specify the correct drill bit size.
- Measure the anchor: If no guidance is provided, use calipers to measure the widest part of the anchor.
- Drill a test hole: In a scrap piece of plasterboard, test the fit before committing to your wall.
Example: Installing A Floating Shelf
A homeowner used a 5/16″ carbide-tipped bit for 5/16″ plastic wall plugs, resulting in a perfect, snug fit. The shelf held 30 lbs with no wall damage, illustrating the importance of exact sizing.
Pro Tip:
If in doubt, start with a slightly smaller bit, it’s easier to widen a hole than repair an oversized one.
Drilling Techniques: Achieving Clean, Safe Holes In Plasterboard
Even the best drill bit can’t compensate for poor technique. Proper method minimizes damage and ensures your fixings are secure.
Marking And Preparing The Hole
- Use a pencil or masking tape to mark the spot. Tape helps prevent surface chipping.
- Check for studs using a stud finder; if you hit one, switch to a wood bit.
Drilling Process
- Set your drill to low speed: High speeds generate heat and vibrations that can tear paper.
- Hold the drill perpendicular: Ensure a straight, even hole.
- Apply steady, gentle pressure: Let the bit do the work.
- Withdraw the bit slowly: Prevents blowouts at the back of the board.
Finishing The Hole
- Clean the edges: Use a utility knife to remove any frayed paper.
- Test fit the anchor: Ensure a snug, not loose, insertion.
Common Mistakes To Avoid
- Forcing the bit or using a dull bit, which increases the risk of cracks.
- Drilling too close to the edge of a board, leading to crumbling.
- Skipping the pilot hole for large bits or anchors.
Example: Electrical Box Installation
An electrician used a 3-1/2″ hole saw with a pilot bit to install a junction box. By drilling slowly and supporting the back of the plasterboard, the hole was clean and free of cracks, demonstrating that proper technique is as critical as bit selection.
Real-world Case Studies And Examples
Case Study 1: Hanging A Large Mirror
A DIYer used a carbide-tipped masonry bit to drill through plasterboard into masonry on a dot and dab wall. By following the anchor manufacturer’s guidance and drilling at low speed, the mirror (weighing 40 lbs) was securely mounted without damaging the wall.
Case Study 2: Running Network Cables
When installing network cabling, a professional used a 1/2″ spade bit for quick holes. After taping the surface and starting with a pilot hole, the cable runs were completed with minimal chipping, saving hours in patching and repairs.
Case Study 3: Mounting Kitchen Cabinets
A kitchen fitter tackled a dot and dab wall by using a long masonry bit to reach the brick behind the plasterboard, followed by specialized cavity fixings. The cabinets were installed level and solid, with no sagging or anchor pullout.
Example: My Experience With Plasterboard Drilling
In my experience, using an HSS twist bit for pilot holes, followed by a properly-sized carbide-tipped bit for final anchor holes, consistently produces the cleanest results. I’ve found that patience, drilling slowly and checking alignment, prevents nearly all common plasterboard issues.
Safety, Maintenance, And Bit Longevity
Choosing the right drill bit is only half the battle; keeping it sharp and using it safely ensures long-term success and reduces risk.
Safety Best Practices
- Wear eye protection to guard against gypsum dust and debris.
- Check for wires and pipes before drilling with a detector or plans.
- Support the back of the board when possible to minimize breakout.
Maintaining Drill Bits
- Clean after use: Remove plaster dust to prevent buildup and rust.
- Sharpen as needed: Dull bits are more likely to tear and cause damage.
- Store properly: Use a case or organizer to prevent chipping.
When To Replace Drill Bits
If you notice increased resistance, excessive vibration, or ragged holes, it’s time to retire the bit. Investing in a quality set pays off in fewer repairs and neater results.
Example: Comparing Bit Longevity
| Bit Type | Average Lifespan (Plasterboard Use) | Maintenance Required |
|---|---|---|
| HSS Twist Bit | 50, 100 holes | Occasional sharpening |
| Carbide-Tipped Bit | 200+ holes | Minimal sharpening |
| Masonry Bit | 100, 150 holes | Frequent cleaning |
| Spade Bit | 30, 50 holes | Sharpen as needed |
Warning:
Never use damaged or bent bits, as they can break inside the wall and cause injury or additional repair work.
Advanced Tips And Tricks For Flawless Plasterboard Drilling
Mastering a few advanced techniques can elevate your results from good to professional-grade.
Using A Depth Stop
Attach a depth stop or wrap tape around the bit to avoid drilling too deep. This is especially important with shallow anchors or when wiring is present behind the wall.
Backing With Scrap Wood
For large holes, holding a piece of scrap wood against the back of the plasterboard supports the paper and prevents blowouts.
Multi-bit Drilling
Start with a pilot hole and gradually increase bit size to the desired diameter. This staged approach minimizes stress on the board and keeps holes clean.
Vacuum While Drilling
To reduce dust, have a helper hold a vacuum hose near the drilling site. This keeps workspaces cleaner and improves visibility.
Pro Tip:
For repeated projects, invest in a set of multi-material bits, they’re versatile and reduce the need for frequent bit changes, saving time and effort.
Selecting The Best Brands
While brand preferences can be subjective, users consistently rate Bosch, DeWalt, and Makita highly for both HSS and carbide-tipped bits. For specialty multi-material bits, check out Wiha Tools for their professional-grade options.
Eco-friendly Disposal
Recycle worn-out bits at local metal recycling facilities to reduce environmental impact, rather than discarding them in general waste.
Frequently Asked Questions
What Happens If I Use A Wood Bit On Plasterboard?
Wood bits (such as spade bits or brad-point bits) can work on plasterboard for small holes, but their aggressive cutting edge and spur can cause the gypsum core to crumble and the paper to tear. The result may be a ragged hole, which can compromise anchor grip and wall integrity.
For a cleaner cut, use a sharp HSS twist bit at low speed, or a carbide-tipped bit for larger holes.
Can I Drill Into Plasterboard Without Creating Dust?
It’s difficult to eliminate dust entirely, but you can minimize it by using a vacuum attachment or having an assistant hold a vacuum hose beneath the drill site. Some drill bits and drill attachments are designed to capture dust as you work.
For small jobs, placing a sticky note or folded paper just below the hole can catch falling dust, keeping your workspace cleaner.
How Do I Repair A Hole In Plasterboard If I Make A Mistake?
If you drill a hole that’s too large or in the wrong spot, you can repair it with a plasterboard patch or filler. For small holes (under 1/2″), use joint compound and sand smooth after drying. For larger holes, cut a square section around the damage, fit a new piece of plasterboard, tape the seams, and finish with joint compound.
Always let repairs dry fully before re-drilling.
Are There Special Drill Bits For Insulated Plasterboard?
Insulated plasterboard (with foam or foil backing) requires extra care. Use a sharp HSS or carbide-tipped bit and drill at low speed. Avoid bits that generate excessive heat, as this can melt foam insulation. If the foil layer is thick, start with a metal bit, then continue with a standard drywall bit.
Always check for manufacturer recommendations specific to your insulation type.
Do I Need To Use Anchors When Drilling Into Plasterboard?
Plasterboard alone is not strong enough to hold screws or heavy loads without anchors. For lightweight items, self-drill anchors or plastic plugs suffice. For medium to heavy loads, use toggle bolts or cavity fixings designed for hollow walls. Directly screwing into plasterboard is rarely secure and should only be done for temporary, lightweight fixings.
References
Similar Posts
Festool Vs Dewalt Drill: Ultimate Comparison Guide
When you’re serious about tools, two brands usually stand out: Festool and DeWalt. These names mean a lot to both professionals…
Milwaukee Vs Ryobi Drill: Which Power Tool Reigns Supreme?
Choosing a power drill can feel overwhelming. With so many brands on the market, two names often stand out: Milwaukee and…
Dewalt Drill Atomic vs Max: Which Model Should You Choose?
The world of power tools is always changing, but two names often come up when people look for a reliable cordless…
Makita Vs Milwaukee Cordless Drill: Which Is Best for You?
Makita Vs Milwaukee Cordless Drill: A Complete, In-depth Comparison If you’re searching for the best cordless drill, you probably see the…
Drilling Vs Milling
The world of machining is built on precision and efficiency, and two of its most essential processes, drilling and milling, are…
Hilti Vs Milwaukee Hammer Drill: Ultimate Performance Showdown
When it comes to power tools for heavy-duty drilling and chiseling, Hilti and Milwaukee are two names professionals trust. Both brands…