Drilling and tapping a hole is a fundamental skill for professionals and hobbyists alike, spanning industries from automotive repair to aerospace manufacturing. Whether you’re assembling a custom project, repairing machinery, or working with metal, the ability to create a threaded hole reliably can mean the difference between success and costly mistakes.
The process may seem straightforward, but achieving optimal results requires precise technique, the right tools, and a solid understanding of materials.
Drawing from years of hands-on experience, this article unpacks every step of drilling and tapping, from selecting the correct drill bit and tap to troubleshooting common issues. You’ll discover practical tips, real-world examples, and authoritative guidance to ensure your results are secure and accurate.
By following these best practices, you’ll not only safeguard your workpiece but also improve efficiency and confidence in your shop or workspace.
Key Takeaways
- Drilling and tapping are essential for creating threaded holes in metal, plastic, and other materials.
- Choosing the correct drill bit and tap size is critical for thread accuracy and strength.
- Proper tool setup and lubrication reduces risk of breakage and ensures clean threads.
- Safety precautions and troubleshooting help prevent common mistakes during the process.
- Real-world examples illustrate best practices and the impact of correct technique.
- A comparison table helps select the ideal tap for your project based on material and hole type.
Understanding Drilling And Tapping
Drilling and tapping are two sequential processes used to create threaded holes. The first step, drilling, involves making a cylindrical hole using a drill bit. Tapping follows, using a tap tool to cut internal threads so bolts or screws can be fastened securely.
The Basics Of Drilling
Drilling begins with selecting the appropriate drill bit for the material and desired hole size. For metalworking, high-speed steel (HSS) bits are commonly used, while cobalt or carbide bits are preferable for harder metals. Proper alignment and steady feed are crucial to avoid damaging the workpiece or bit.
Pro Tip: Always clamp your workpiece firmly to prevent spinning or movement during drilling.
The Basics Of Tapping
Tapping uses a tap tool, which is a hardened steel rod with cutting threads. The tap is inserted into the drilled hole and rotated, cutting threads that match a specific bolt or screw size. The process can be done manually with a tap wrench or with machinery for higher precision.
Materials Suitable For Drilling And Tapping
Most metals, including steel, aluminum, brass, and cast iron, can be drilled and tapped. Plastics such as acrylic and polycarbonate are also suitable, though they require careful handling to avoid cracking. The hardness and ductility of the material affect tap selection and technique.
Common Applications
- Automotive repairs: Installing sensors or brackets
- Aerospace manufacturing: Creating threaded holes in aircraft components
- Home improvement: Mounting fixtures in metal or plastic
- Industrial machinery: Repairing or fabricating parts
Credit: www.6gtools.com
Selecting The Right Tools And Materials
Choosing the correct tools is fundamental to the success of drilling and tapping. The most important considerations are material type, hole size, and thread specifications.
Drill Bit Selection
Drill bits come in various materials and geometries. For most metals, HSS or cobalt bits are suitable. For plastics, use sharp, non-pointed bits to prevent melting.
| Material | Recommended Drill Bit | Notes |
|---|---|---|
| Steel | HSS, Cobalt | Cobalt for hardened steel |
| Aluminum | HSS | Use lubricant for clean hole |
| Brass | HSS | Slow feed, avoid grabbing |
| Plastic | Sharp HSS | Low speed to prevent melting |
Tap Selection
Taps are categorized by their purpose and geometry. The three primary types are taper taps, plug taps, and bottoming taps. Taper taps start threads gently, plug taps are used for deeper holes, and bottoming taps finish threads near the hole’s bottom.
Tap Material
The tap’s material should match the workpiece. For hard metals, high-carbon steel or cobalt taps are recommended. For softer materials, HSS taps suffice.
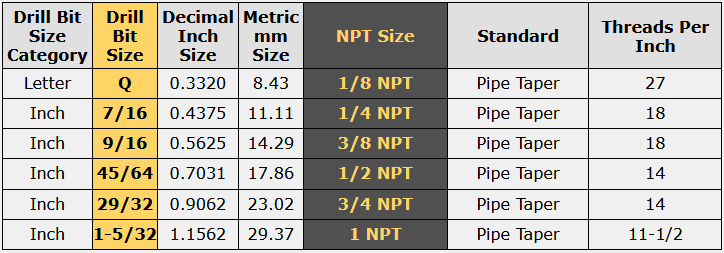
Drill And Tap Size Chart
Matching the drill bit to the tap is crucial. A mismatch can result in weak threads or broken taps. Refer to the following chart for common thread sizes:
| Thread Size (UNC/UNF) | Tap Size | Recommended Drill Size |
|---|---|---|
| 1/4-20 UNC | 1/4″ | #7 (0.201″) |
| 3/8-16 UNC | 3/8″ | 5/16″ (0.3125″) |
| 1/2-13 UNC | 1/2″ | 27/64″ (0.4219″) |
| M6 x 1.0 | M6 | 5.0 mm |
| M8 x 1.25 | M8 | 6.8 mm |
Lubricants
Lubricants reduce friction and help clear chips during both drilling and tapping. For steel, use cutting oil; for aluminum, a light oil suffices. Plastics generally do not require lubrication.
Safety Gear
Always wear safety glasses to protect your eyes from chips. Gloves are optional but should not be used near rotating machinery due to entanglement risk.

Credit: www.wikihow.com
Step-by-step Guide To Drilling And Tapping
Executing the drilling and tapping process with precision requires careful preparation and attention to detail. Below is a comprehensive step-by-step guide.
Step 1: Marking And Center Punching
Before drilling, mark the hole location with a permanent marker or scribe. Use a center punch to create a small indentation. This prevents the drill bit from wandering as you start.
Step 2: Drilling The Hole
- Clamp the workpiece firmly.
- Select the correct drill bit as per the tap chart.
- Attach the bit to a drill press or hand drill.
- Set the speed for the material (lower for metals, higher for plastics).
- Apply lubricant if required.
- Align the drill perpendicular to the surface.
- Drill slowly, clearing chips frequently.
Example: In a recent project, I drilled a 1/4-20 hole in aluminum using a #7 bit and cutting oil. The hole was smooth, and the tap followed easily.
Step 3: Deburring
After drilling, use a deburring tool or countersink to remove sharp edges. This ensures the tap enters smoothly and prevents thread damage.
Step 4: Selecting And Preparing The Tap
Choose the tap type (taper, plug, bottoming) based on hole depth. Apply lubricant to the tap for metals.
Step 5: Tapping The Hole
- Insert the tap into the hole, keeping it perpendicular.
- Turn the tap gently with a tap wrench.
- After each full turn, reverse a quarter turn to break chips.
- Continue until threads reach desired depth.
- Remove tap and clean hole.
Warning: Applying too much force can break the tap, especially in hard metals.
Step 6: Cleaning And Inspecting
Remove any remaining chips with compressed air or a brush. Inspect threads with a thread gauge or by fitting the appropriate screw.
Step 7: Final Assembly
Install the fastener to test the threads. If resistance is high, retap carefully or inspect for debris.

Credit: waykenrm.com
Troubleshooting Common Issues
Even experienced machinists encounter problems during drilling and tapping. Identifying and addressing these issues promptly is crucial for high-quality results.
Drill Bit Wandering
Drill bit movement is usually caused by a lack of center punching or improper clamping. Always use a center punch and secure the workpiece.
Tap Breakage
Broken taps are frustrating and can ruin the workpiece. Causes include:
- Using the wrong drill size (hole too small)
- Excessive force or lack of lubrication
- Tapping at an angle
Pro Tip: If a tap breaks, use a tap extractor or seek professional help. Do not attempt to drill out the tap as it is harder than most drill bits.
Poor Thread Quality
Threads may be rough or incomplete due to:
- Incorrect tap selection
- Skipping lubrication
- Debris not cleared during tapping
Inspect threads with a gauge and retap if necessary.
Hole Misalignment
Misaligned holes compromise assembly strength. Use a drill press or guide block for straight holes.
Fastener Fit Issues
If the fastener does not fit:
- Recheck tap and drill sizes
- Clean threads thoroughly
- Use a thread chaser to repair minor damage
Case Study: Automotive Repair
An automotive technician needed to install a new sensor in an engine block. Using the correct tap and drill size prevented leaks and ensured the sensor fit tightly. Failure to follow proper tapping technique could have resulted in engine damage.
Real-world Examples And Best Practices
Learning from practical examples helps solidify the drilling and tapping process. Here are three real-world cases that illustrate best practices and challenges.
Example 1: Aircraft Component Fabrication
An aerospace manufacturer needed to tap holes in titanium panels. Using cobalt drill bits and high-carbon steel taps, with continuous lubrication, minimized tool wear. A tap guide ensured perpendicular alignment, and thread gauges verified accuracy. The result was high-quality, reliable threads, crucial for safety in flight.
Example 2: Home Workshop Project
In my experience, building a custom motorcycle bracket required tapping several holes in steel. Clamping the workpiece, using a drill press, and applying cutting oil led to smooth drilling. A plug tap was used for deeper threads, and frequent chip clearing prevented tap breakage.
Example 3: Industrial Machinery Maintenance
A maintenance team needed to repair a broken bolt hole in a cast iron machine. They selected a taper tap and drilled the hole with a slow feed. Using compressed air to clear chips during tapping prevented clogging. The repaired thread restored machine function, saving thousands in downtime.
Comparison Of Tap Types And Applications
Choosing the correct tap type for your application is essential. The following table compares taper, plug, and bottoming taps.
| Tap Type | Starting Ease | Thread Depth | Best For | Notes |
|---|---|---|---|---|
| Taper Tap | High | Shallow | Initial threading | 7, 10 thread lead |
| Plug Tap | Moderate | Medium | General use | 3, 5 thread lead |
| Bottoming Tap | Low | Deep | Blind holes | 1, 2 thread lead |
Safety And Best Practices
Safety is paramount when working with power tools and sharp instruments. Following best practices prevents accidents and ensures high-quality results.
Personal Protective Equipment
- Safety glasses: Protect eyes from metal chips.
- Hearing protection: Use when drilling multiple holes.
- Gloves: Optional; avoid near rotating tools.
Workspace Preparation
Keep the workspace clean and organized. Secure tools and materials. Ensure good lighting for precise work.
Tool Maintenance
Regularly inspect drill bits and taps for wear or damage. Dull tools increase risk and reduce thread quality.
Lubrication
Apply lubricant during both drilling and tapping to reduce friction and heat. This prolongs tool life and improves results.
Chip Removal
Clear chips frequently, especially during tapping. This prevents clogging and tap breakage.
Professional Consultation
For critical or complex projects, consult a certified machinist or engineer. Refer to authoritative resources like Wikipedia: Tap and Die for technical details.
Advanced Techniques And Tools
For complex or high-volume projects, advanced techniques and tools can increase efficiency and precision.
Power Tapping
Power tapping uses machines to rotate the tap, ideal for production environments. Machines ensure consistent alignment and speed.
Thread Milling
Thread milling creates threads with a specialized cutter. It is more precise than tapping and suitable for hard materials.
Tap Guides And Holders
Tap guides keep the tap perpendicular to the workpiece, reducing misalignment. Tap holders can be attached to drill presses for steady motion.
Cnc Drilling And Tapping
CNC machines automate the process, ensuring repeatable accuracy. Programming must match tap and drill sizes precisely.
Specialty Lubricants
Advanced lubricants, such as synthetic cutting oils, improve tool life and thread quality in demanding materials.
Example: Manufacturing Facility
A manufacturing facility switched from manual tapping to CNC thread milling for stainless steel parts. The result was a 30% reduction in tool breakage and improved thread consistency, according to Machinery’s Handbook.
Frequently Asked Questions
What Is The Difference Between Tapping And Thread Milling?
Tapping uses a tap to cut threads directly into the hole, while thread milling uses a rotating cutter to create threads. Thread milling allows for more flexibility in thread size and is preferable for hard or tough materials, as it generates less stress on the workpiece.
Can I Tap A Hole Without A Tap Wrench?
While a tap wrench is the ideal tool for tapping, you can use alternatives like adjustable pliers in a pinch. However, this increases the risk of misalignment and tap breakage. For best results, always use a dedicated tap wrench or a tap holder.
How Do I Remove A Broken Tap From A Hole?
Removing a broken tap requires specialized tools such as tap extractors or EDM (electrical discharge machining). In most cases, it’s best to consult a professional machinist. Attempting to drill out the tap is ineffective due to the hardness of tap steel.
How Do I Determine The Correct Tap For Blind Holes?
Blind holes require bottoming taps, which have minimal thread lead and cut threads close to the hole’s bottom. Start with a taper or plug tap, then finish with a bottoming tap. Always ensure the tap matches the desired thread specification.
What Should I Do If My Threads Are Damaged After Tapping?
Damaged threads can be repaired using thread chasers or by installing a thread insert (such as a Helicoil). For significant damage, drilling out the hole and retapping with a larger size may be necessary. Consult a thread repair specialist for critical applications.
Drilling and tapping a hole is a skill that improves with practice and attention to detail. By understanding the process, selecting the right tools, and following best practices, you can ensure strong, reliable threads for any project. Whether you’re working in a professional shop or at home, these techniques will help you achieve accurate and durable results, setting the foundation for quality craftsmanship and lasting assemblies.