Drilling into plexiglass can feel intimidating, even for experienced DIYers. Plexiglass, also known as acrylic sheet or Perspex, is strong but brittle. One wrong move and cracks can ruin your whole project. But with the right approach, you can make clean, precise holes in plexiglass without any damage.
Whether you’re making a display case, customizing a window, or working on a craft project, mastering this skill will save you time, money, and frustration.
This guide covers everything you need to know about drilling plexiglass safely. You’ll learn why plexiglass cracks, what tools work best, step-by-step drilling techniques, and smart tips that even many professionals overlook. With these methods, you’ll avoid common mistakes and get perfect results every time.
Why Plexiglass Cracks When Drilled
Before you grab your drill, it helps to understand why plexiglass cracks so easily. Plexiglass is made from a type of plastic called polymethyl methacrylate (PMMA). It’s about 17 times stronger than glass but much more sensitive to heat and pressure. When you drill, the fast-moving bit creates friction. This heat softens the plastic, while pressure from the bit can stress the material. These two forces together can cause tiny fractures that quickly grow into visible cracks.
Some common reasons for cracking include:
- Using the wrong drill bit (like one for metal or wood)
- Drilling too fast
- Applying too much pressure
- Not supporting the plexiglass properly
- Not cooling the drill area
Knowing these reasons is the first step to avoiding them.
Choosing The Right Tools
Your tools are the foundation of a good result. The right drill bits and equipment will make the difference between success and disaster.
Best Drill Bits For Plexiglass
Ordinary metal or wood drill bits have a steep angle and sharp tip. They grab the plastic and dig in too fast, which increases the risk of cracking. Instead, use special acrylic drill bits. These have a flatter angle (about 60°) and a blunt tip that scrapes away material gradually.
You can find these at hardware stores or online. If you don’t have access to acrylic bits, you can modify a standard bit by dulling the tip with a file. This reduces the aggressiveness of the cut. Step drill bits are another good option for larger holes since they cut smoothly and don’t grab.
Here’s how acrylic bits compare to standard bits:
| Drill Bit Type | Tip Angle | Risk of Cracking | Recommended Use |
|---|---|---|---|
| Acrylic/Plastic Bit | 60°-90° (flat) | Very Low | Plexiglass, acrylic |
| Metal/Wood Bit | 118°-135° (sharp) | High | Metal, wood |
| Step Drill Bit | N/A (stepped) | Low | Wider holes in plastic |
Drill Type And Speed
You don’t need a fancy drill for plexiglass. A basic corded or cordless drill works fine. The important part is speed control. Use a slow speed setting (500–1000 RPM for small holes, 300–500 RPM for larger holes). High speed makes too much heat and can melt or crack the plastic.
Support Materials
Plexiglass needs support while you drill. Place a piece of scrap plywood or MDF under the plexiglass. This reduces vibration and helps prevent blowout (cracking on the underside as the bit exits).
Safety Gear
Always wear safety glasses. Small chips or dust can fly up when drilling. A dust mask is a good idea if you’re making many holes or working indoors.
Preparing Plexiglass For Drilling
Preparation is just as important as the drilling itself. A few minutes here can save your project.
Marking The Hole
Use a soft marker or wax pencil to mark where you want the hole. Avoid sharp objects like pencils or knives, which can scratch the surface.
If you need exact placement, use a ruler or template. For multiple holes in a line, a straightedge is helpful.
Taping The Surface
Put masking tape or painter’s tape over the drilling spot. This gives the drill bit extra grip and helps prevent chipping. Mark your hole location on the tape for better visibility.
Clamping And Supporting
Clamp the plexiglass securely to your workbench. Place your support board underneath. Make sure the area under the hole is fully backed up. Too much movement during drilling is a major cause of cracks.
Don’t clamp too tightly—excessive pressure can cause stress before you even start drilling.
Removing The Protective Film
Most plexiglass sheets come with a thin plastic film. It’s best to leave this on until after drilling to protect the surface from scratches. Only peel it back from the area where you need to drill if the film is thick and interferes with your markings.
Step-by-step Drilling Technique
With your tools ready and the plexiglass prepared, you’re set to drill.
1. Start With A Pilot Hole
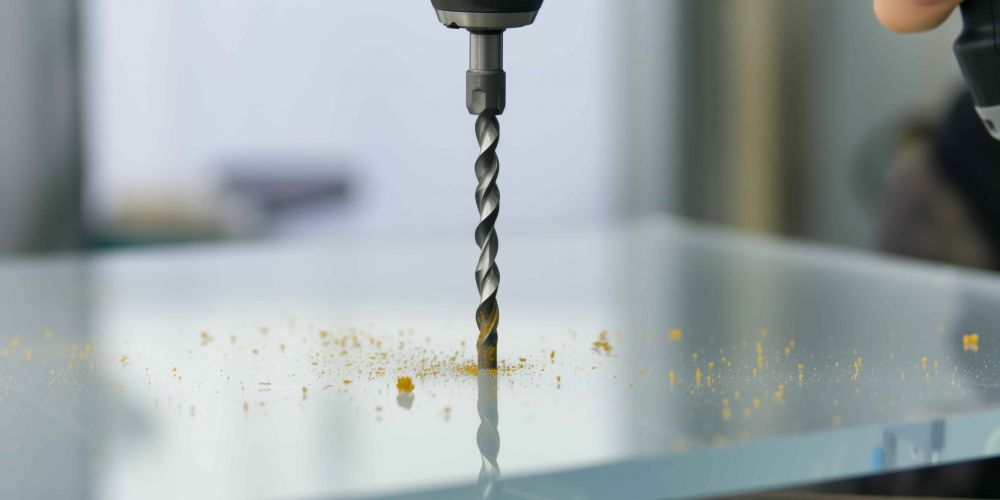
Use a small bit (1/8″ or 3mm) to make a pilot hole. This helps guide the larger bit and reduces cracking risk. Hold the drill at a 90-degree angle to the surface.
2. Use Slow, Steady Speed
Set your drill to the lowest speed. Gently squeeze the trigger. If your drill has variable speed, keep it under 1000 RPM for small holes.
3. Let The Bit Do The Work
Don’t push hard. Apply just enough pressure to keep the bit moving forward. If you feel the bit grabbing or the plexiglass bending, stop and adjust.
4. Pause And Cool
For deep holes or thick sheets, stop every few seconds to let the material cool. You can dip the bit in water between passes or squirt a little water on the drilling area. This reduces heat buildup.
5. Enlarge The Hole If Needed
If you need a bigger hole, switch to the next size bit and repeat the process. Step drill bits are especially useful for this. Don’t jump from very small to very large bits in one step.
6. Support The Exit Side
The most common place for cracks is where the bit comes out. Keep firm support underneath and slow down as you finish the hole. If possible, flip the plexiglass and finish drilling from the other side.
7. Clean The Hole
Remove tape and any plastic shavings. If the hole edge is rough, use a deburring tool or a rolled piece of fine sandpaper to smooth it.
Preventing Common Mistakes
Even experienced users make mistakes with plexiglass. Here’s how to avoid the most frequent problems.
Drilling Too Fast
This is the leading cause of cracks. High speed = more heat and more melting. Always use the lowest effective speed.
Using The Wrong Bit
Standard bits are a common trap for beginners. Even if you have to dull a normal bit yourself, it’s better than using a sharp metal bit.
Skipping The Pilot Hole
Jumping straight to a large bit puts too much stress on the plastic. Always start small and work up.
Not Supporting The Workpiece
Unsupported plexiglass vibrates and flexes, leading to cracks. Use a scrap board underneath every time.
Over-clamping
Tight clamps can crack the edges of plexiglass, especially near the corners. Firm, but not crushing, is best.
Ignoring Cooling
If you see melted plastic or smell burning, you’re going too fast or not cooling enough. Take breaks and add water if needed.
Drilling Holes Of Different Sizes
The size of the hole affects your drilling method.
Small Holes (under 1/4” Or 6mm)
These are easiest. Use a sharp acrylic bit, slow speed, and steady pressure. Pilot holes are optional but helpful.
Medium Holes (1/4” To 1/2” Or 6–12mm)
Start with a pilot hole, then use a larger bit or step drill. Take extra care with cooling and support.
Large Holes (over 1/2” Or 12mm)
Use a hole saw or step drill. Mark the area well, start with a small pilot hole, and enlarge gradually. Large holes are the most likely to crack at the edges, so use plenty of support and tape. For holes over 1” (25mm), consider using a hole saw with fine teeth designed for plastics.
Here’s a quick comparison of drilling methods for different hole sizes:
| Hole Size | Best Tool | Preparation Needed | Cracking Risk |
|---|---|---|---|
| Under 1/4” (6mm) | Acrylic drill bit | Tape, optional pilot hole | Low |
| 1/4”–1/2” (6–12mm) | Step drill, larger acrylic bit | Pilot hole, tape, support | Medium |
| Over 1/2” (12mm) | Hole saw, step drill | Pilot hole, tape, cooling | High |

Credit: www.clearlyplastic.com
Special Tips For Flawless Results
Even if you follow every basic rule, a few expert tricks can make your work look professional.
Use Soap Or Water For Lubrication
A little water or a drop of mild soap at the drilling spot helps cool the bit and reduce friction. This keeps the plexiglass from melting or sticking to the drill.
Drill Upright
Hold your drill at a perfect 90-degree angle. Angled drilling increases side pressure and causes uneven holes or cracks.
Avoid The Edges
Keep holes at least twice their diameter away from the edge of the plexiglass. For example, if you’re drilling a 1/4” hole, stay at least 1/2” away from any edge. Holes too close to the edge almost always crack.
Practice First
If you’re new to plexiglass, practice on a scrap piece before starting your real project. This builds confidence and lets you test your settings.
Deburr Carefully
After drilling, use a deburring tool or a countersink bit to gently clean the hole edge. This removes sharp edges that can start cracks later.
Clean Up Dust
Acrylic dust can scratch the surface if wiped while dry. Use a vacuum or soft brush instead of a cloth.
Choosing Between Plexiglass And Other Plastics
Sometimes, you might wonder if another plastic is easier to drill. Here’s a quick look at how plexiglass compares to other common plastics:
| Material | Strength | Cracking Risk | Ease of Drilling | Common Uses |
|---|---|---|---|---|
| Plexiglass (Acrylic) | High | High | Medium | Windows, displays |
| Polycarbonate (Lexan) | Very High | Low | Easy | Machine guards, shields |
| PVC Sheet | Medium | Low | Easy | Signage, panels |
Plexiglass is strong and clear but more prone to cracking than polycarbonate, which is almost unbreakable and easier to drill. However, plexiglass is usually less expensive and does not yellow over time like some plastics.
Credit: www.cutmy.co.uk
Real-world Applications And Examples
Drilling plexiglass comes up in many projects:
- Making custom windows for boats or greenhouses
- Building display cases for collectibles
- Adding ventilation holes to equipment enclosures
- Creating DIY photo frames or wall art
- Modifying aquariums for filter installation
A beginner might not realize that even a small crack can ruin the whole sheet. For example, when making an aquarium lid, drilling too close to the corner can lead to stress cracks that spread over time with temperature changes.
Always plan your hole locations and sizes before you start.
Non-obvious Insights For Better Drilling
1. Let The Bit Cool Between Holes:
Many people drill a series of holes quickly. But the bit gets hotter each time, increasing the risk of melting or cracks. Take a short break or dip the bit in water after each hole.
2. Check For Microcracks:
After drilling, use a magnifying glass to check for tiny fractures. They might not be visible at first but can spread with time. If you spot any, smooth the hole edges with sandpaper or a deburring tool.
3. Don’t Remove Tape Too Soon:
Keep masking tape on until all drilling and cleanup are finished. Removing it early can pull up chips or create scratches.
4. Use A Backing Sheet That’s Clean And Flat:
A dirty or uneven backing board can transfer debris or create pressure points, which can scratch or crack the plexiglass.
5. Store Plexiglass Flat:
If your sheet is curved or bowed, flatten it before drilling. Drilling on a bowed sheet creates uneven stress and increases the chance of cracks.

Credit: www.youtube.com
Frequently Asked Questions
How Do I Stop Plexiglass From Cracking When Drilling?
Use a special acrylic drill bit, drill at a slow speed, and support the plexiglass with a backing board. Tape the drilling area, start with a small pilot hole, and avoid too much pressure. Cooling the bit and the material also helps prevent cracks.
Can I Use A Regular Drill Bit For Plexiglass?
You can, but it’s not ideal. Regular bits for metal or wood have a sharp angle that grabs the plastic and increases cracking risk. If you must use a standard bit, dull the tip with a file to make it less aggressive.
For best results, use an acrylic or step bit.
Should I Use Water When Drilling Plexiglass?
Yes, a little water or mild soap can cool the drill bit and reduce friction. This helps prevent melting and cracking. You can spray water on the area or dip the bit in water between holes.
How Close To The Edge Can I Drill A Hole In Plexiglass?
Keep holes at least twice their diameter away from any edge. For example, a 1/4” hole should be at least 1/2” from the edge. Closer holes are much more likely to cause cracks, especially under pressure.
What’s The Best Way To Smooth Drilled Holes In Plexiglass?
After drilling, remove any roughness with a deburring tool or rolled-up fine sandpaper (400–600 grit). Turn the tool gently inside the hole edge. Avoid twisting too hard or using power tools, which can melt or stress the plastic.
Drilling plexiglass doesn’t have to be risky or frustrating. With the right tools, careful preparation, and these practical methods, you’ll get clean, professional holes every time. For more details on working with acrylics, check resources like Wikipedia.
Take your time, use patience, and practice on scraps first. Your finished projects will look as clear and strong as you imagined.