Drilling into porcelain tile can feel intimidating, even for experienced DIYers. Porcelain is beautiful, durable, and waterproof—qualities that make it a popular choice for kitchens and bathrooms. But these same strengths also make it one of the hardest materials to drill.
The risk of cracking, chipping, or ruining a tile is high if you use the wrong technique. However, with the right preparation and knowledge, you can achieve clean, precise holes in porcelain tile without damage. In this detailed guide, you’ll learn how to choose the best tools, prepare your workspace, avoid common mistakes, and safely drill into porcelain tile like a pro.
Why Porcelain Tile Is So Hard To Drill
Porcelain is made from refined clay fired at extremely high temperatures. This process creates a tile that is denser and harder than standard ceramic. Porcelain’s water absorption rate is usually less than 0. 5%, making it highly resistant to stains and moisture.
But this density also means that regular drill bits and hasty techniques can easily damage the tile or your tools.
Compared to glass or ceramic, porcelain’s strength is a double-edged sword. It resists scratching and wear, but it also causes friction and heat to build up quickly during drilling. This can crack the tile’s surface or even shatter it. That’s why understanding the right approach is essential for anyone working with porcelain tiles.
Essential Tools And Materials
Before you start, gather all the necessary supplies. Using the correct tools is the most important factor for success.
| Tool/Material | Purpose | Notes |
|---|---|---|
| Diamond-tipped drill bit | Drilling through porcelain | Best for clean, fast holes |
| Masonry drill bit | Alternative for small projects | Not as effective as diamond tip |
| Drill (variable speed) | Rotates the bit | Low speed, steady pressure |
| Masking tape | Prevents slipping | Also reduces surface chipping |
| Spray bottle with water | Cools the bit and tile | Prevents overheating |
| Marker or pencil | Mark drilling location | Use non-permanent marker |
| Suction cup guide or template | Keeps drill bit steady | Optional, but helpful |
| Safety goggles & gloves | Protects eyes/hands | Essential for safety |
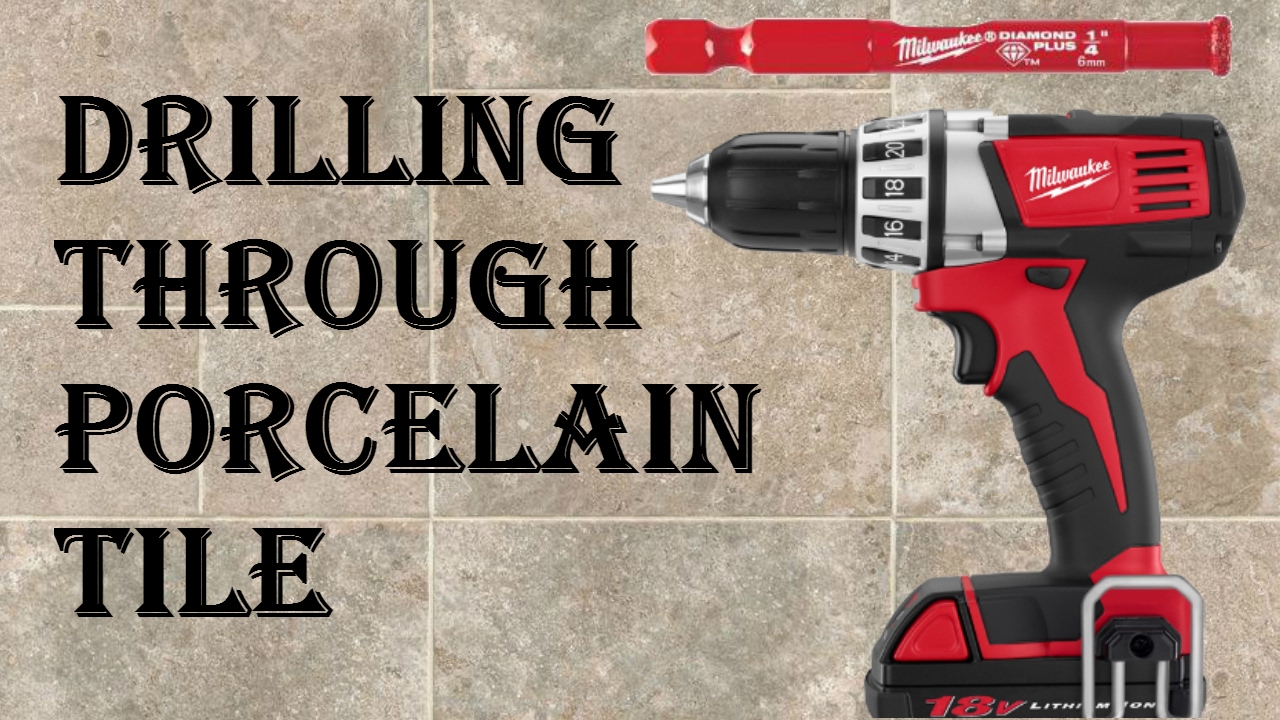
Diamond-tipped drill bits are the gold standard for porcelain. They grind through the tile instead of tearing or cracking it. Never use standard wood or metal bits, which will dull quickly and risk tile damage.
Preparing The Tile Surface
Preparation is critical. Rushing this step often leads to cracked tiles and wasted time. Here’s how to set up for success:
- Clean the tile: Wipe away all dust, dirt, and grease from the tile surface. A clean surface helps tape stick and ensures accuracy.
- Mark your spot: Use a fine-tip marker or pencil to indicate exactly where you want the hole. Double-check measurements before drilling.
- Apply masking tape: Place two layers of tape over the spot you marked. This gives the drill bit extra grip and helps prevent the bit from wandering.
- Set up water cooling: Fill a spray bottle with water, or have a damp sponge nearby. Drilling generates heat; cooling prevents cracks.
- Check for obstacles: If drilling into a wall, use a stud finder to avoid pipes or wires. Never drill blindly in bathrooms or kitchens.
A non-obvious tip: If you are drilling multiple holes, it helps to create a cardboard or plastic template with pre-made holes. This keeps each drill point consistent, especially on larger tile installations.
Choosing The Right Drill Bit
Not all drill bits are created equal. The type of bit you use affects the quality of the hole and the safety of your project.
Diamond-tipped Drill Bits
These are the best option for porcelain tile. They have a hollow, cylindrical shape with diamond grit on the edge. The diamonds grind away the tile, producing a clean hole with minimal force.
Advantages:
- Clean, precise holes
- Less risk of cracking
- Lasts longer if kept cool
Disadvantages:
- More expensive than standard bits
- Requires water for cooling
Carbide-tipped Masonry Bits
Some people use these for porcelain, but they are better for softer ceramics. They can work for small, single holes, but they dull quickly and may cause chipping.
Advantages:
- Cheaper and widely available
- Works for softer tiles
Disadvantages:
- Not ideal for porcelain
- Higher risk of damage
Pro tip: Always check the packaging. If it does not say “suitable for porcelain,” it’s better to upgrade to diamond-tipped bits. Saving a few dollars on tools can cost much more in damaged tiles.
Step-by-step Process For Drilling Porcelain Tile
Drilling porcelain tile is a process that rewards patience and attention to detail. Here are the steps you should follow:
1. Double-check Measurements And Location
Measure twice, drill once. Porcelain tile is unforgiving—one wrong hole is permanent. Confirm placement for fixtures, shelves, or hooks before starting.
2. Secure The Tile
If the tile is already installed on the wall or floor, ensure the area is stable and not loose. For loose tiles, place them on a flat, padded surface to prevent breakage.
3. Use A Guide
If you have a drill guide or suction cup template, position it over the mark. This helps prevent the bit from slipping. If you don’t have a guide, start with the drill bit at a 45-degree angle and slowly bring it upright as you begin to make a dent.
4. Start Drilling At Low Speed
Set your drill to its lowest speed setting. High speeds can overheat the bit and the tile, causing cracks. Apply gentle, even pressure—let the bit do the work.
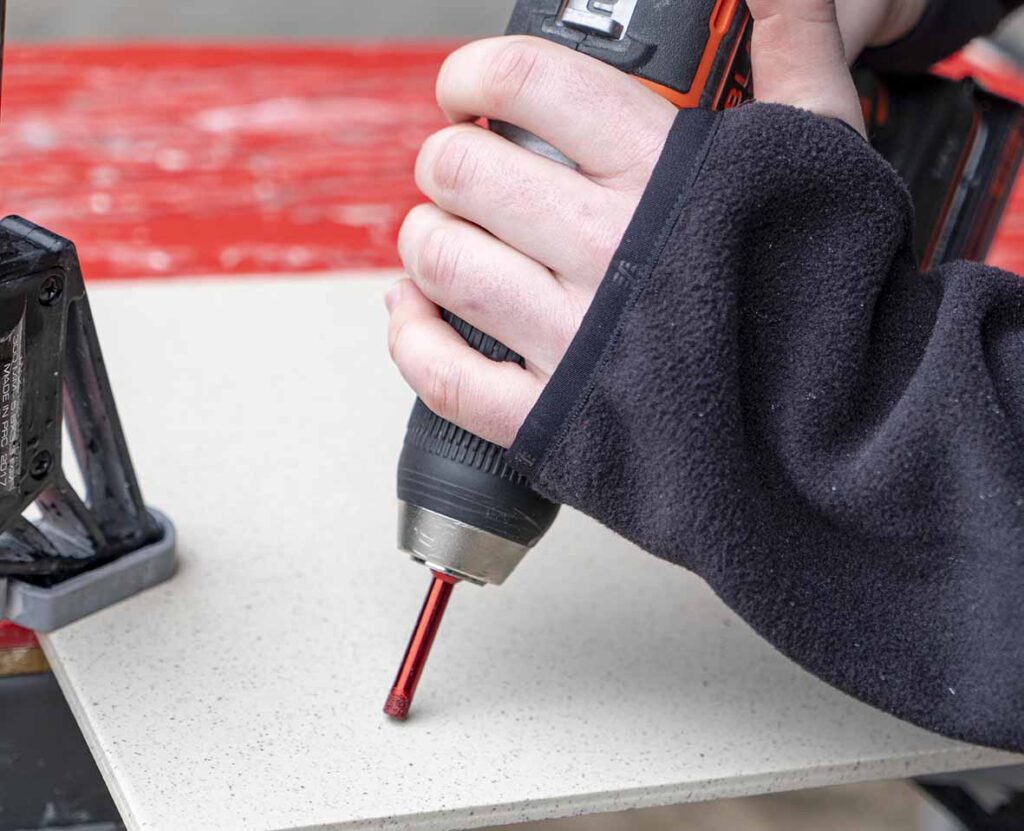
5. Cool The Bit Frequently
Pause every 10–15 seconds to spray water or dab the area with a wet sponge. Keeping the bit and tile cool is crucial for avoiding overheating and breakage.
6. Drill Through The Tile
Continue with slow, steady pressure. Do not rush. Once you feel the bit break through the back of the tile, ease off the pressure to avoid chipping the exit hole.
7. Clean The Hole
After drilling, clear away dust and debris with a damp cloth. Check that the hole is clean and the tile is undamaged before inserting anchors or screws.
A mistake many beginners make is pushing too hard on the drill. This usually leads to cracks or uneven holes. Let the drill and bit do the work—patience pays off with porcelain.
Comparing Drill Bit Performance
For those curious about how different drill bits perform on porcelain tile, here’s a quick comparison:
| Drill Bit Type | Porcelain Compatibility | Average Lifespan (holes) | Risk of Chipping |
|---|---|---|---|
| Diamond-tipped | Excellent | 20-50 | Low |
| Carbide-tipped masonry | Fair | 3-7 | Medium-High |
| Standard steel | Poor | 1-2 (often fails) | Very High |
This data shows why investing in a diamond-tipped bit is usually worth it for porcelain. Most DIYers find that the money saved on damaged tiles or failed attempts more than covers the cost of a quality bit.
Credit: www.rubi.com
Techniques For Drilling Different Hole Sizes
Not all holes are the same. Sometimes, you need a small hole for a screw anchor. Other times, you need a larger hole for pipes or electrical outlets.
Drilling Small Holes (up To 6mm)
- Use a small diamond-tipped bit.
- Start slow, keep the area cool, and apply gentle pressure.
- For screw anchors, use a size slightly larger than the anchor diameter.
Drilling Large Holes (10mm And Above)
- Use a diamond hole saw (sometimes called a core bit).
- Mark the outline, and use a guide to keep the bit steady.
- Begin at an angle, then straighten as the bit starts to cut.
- For holes larger than 25mm, some people drill a series of small holes around the perimeter before finishing the center.
Tip beginners often miss: When drilling large holes, always keep the hole saw cool. Overheating can ruin even high-quality bits and damage expensive tiles.
Preventing Cracks And Chipping
Cracks and chips are the biggest worries when drilling porcelain tile. Here’s how to avoid them:
- Never drill at high speed. High RPM creates friction and heat, leading to cracks.
- Use water for cooling. This is not optional—without cooling, your bit and tile will overheat.
- Avoid hammer action. Never use the hammer/drill function. Porcelain is too brittle for hammering.
- Support the tile. If drilling a loose tile, place a towel or foam pad underneath.
- Slow down at the end. As the bit breaks through, reduce pressure to avoid blowout.
Another non-obvious trick: If you must drill near an edge, place the hole at least 15mm from the edge. Holes closer to the edge are much more likely to chip, especially on thin tiles.
Safety Tips When Drilling Porcelain Tile
Drilling tile isn’t just about technique—it’s also about safety. Tiny shards can fly off the tile, and dust can irritate your lungs and eyes.
- Wear safety goggles to protect your eyes from chips and dust.
- Use gloves to prevent cuts from sharp edges.
- Keep the area well-ventilated, especially if working indoors.
- Wear a dust mask if drilling multiple holes or using power tools for long periods.
- Unplug power tools when changing drill bits.
Also, always keep children and pets away from the workspace. Even small pieces of tile can be sharp enough to injure.
What To Do If You Crack A Tile
Accidents can happen, even with the best preparation. If you crack a tile while drilling, here are your options:
- Minor cracks: If the crack is small and will be hidden by a fixture (like a towel bar base), you can use clear epoxy to seal the crack and prevent water intrusion.
- Major cracks or chips: The best solution is to replace the tile. It’s frustrating, but patched tiles often fail over time, especially in wet areas.
- Chipped holes: For small chips around the hole, use a matching grout or caulk to fill and conceal the damage.
If replacing a tile, be patient. Remove all grout around the tile, gently break up the damaged piece, and install a new one with fresh adhesive and grout.
Drilling Porcelain Tile On Floors Vs. Walls
There are a few differences between drilling floor tiles and wall tiles:
- Floor tiles are often thicker and denser. Use extra care to keep the bit cool, and expect slightly longer drilling times.
- Wall tiles can sometimes be thinner, but they’re often installed over fragile drywall. Be gentle to avoid damaging the backing.
- For both, always drill perpendicular to the surface for the cleanest hole.
It’s also worth noting that floor tiles usually have a more robust glaze. This means the surface is even harder, and slipping is more likely. Always use masking tape or a guide.
How Many Holes Can One Bit Drill?
A common question is how many holes you can expect from one diamond-tipped bit. The answer depends on several factors: the quality of the bit, the thickness and hardness of the tile, and your drilling technique.
- High-quality bits: Typically last for 20–50 holes in porcelain if cooled properly.
- Cheaper bits: May last only 5–10 holes before dulling.
- Overheating: Can ruin a bit after just 1–2 holes.
If you notice the bit taking longer to cut, or if it starts to make screeching noises, it’s probably time to replace it.
Mistakes To Avoid When Drilling Porcelain Tile
Many first-timers make the same errors. Avoid these to save time, money, and frustration:
- Using the wrong drill bit: Standard bits just won’t work.
- Drilling too fast: Speed is your enemy with porcelain.
- Skipping water cooling: Without water, you’ll crack tiles and ruin bits.
- Forgetting to mark the spot: Guesswork leads to misplaced holes.
- Not supporting loose tiles: Unsupported tiles crack easily.
- Ignoring safety gear: Eye injuries from tile shards are common.
Another common mistake: Failing to consider what’s behind the tile. Always check for pipes, wires, or other hazards before drilling.
Advanced Tips For Perfect Results
If you want truly professional results, consider these advanced tips:
- Use a “pilot hole” technique: For large holes, start with a small (3–4mm) diamond bit to make a pilot hole, then switch to a larger hole saw.
- Vacuum dust as you drill: If possible, have a helper hold a vacuum hose near the drill site to keep the area clean and reduce airborne dust.
- Buy a variable speed drill: This gives you more control and prevents accidental high-speed mistakes.
- Invest in a drill stand or guide: Especially useful for large holes or repeated drilling.
If you’re installing many fixtures, these small upgrades can save hours of frustration and dozens of ruined tiles.

Credit: www.youtube.com
Comparing Porcelain To Other Tile Types
It’s helpful to know how porcelain compares to other common tiles when it comes to drilling.
| Tile Type | Drilling Difficulty | Best Drill Bit | Risk of Cracking |
|---|---|---|---|
| Porcelain | Hard | Diamond-tipped | Medium-High |
| Ceramic | Medium | Carbide-tipped | Medium |
| Natural stone | Varies (usually hard) | Diamond-tipped | Medium |
| Glass | Medium | Diamond-tipped | High |
Porcelain is among the most challenging to drill, but with the right tools and patience, it’s possible to achieve perfect holes.
When To Call A Professional
Sometimes, it’s better to hire a professional tiler or handyman. Consider calling an expert if:
- You need to drill many holes in expensive or irreplaceable tiles.
- The holes must be perfectly aligned for visible fixtures.
- You’re not comfortable with power tools.
- There are pipes or wires behind the tile that you can’t locate.
A skilled professional will have specialized tools, such as water-fed drills and dust extraction systems, for the cleanest possible results.
Frequently Asked Questions
What Is The Best Drill Bit For Porcelain Tile?
The best drill bit for porcelain tile is a diamond-tipped bit. These bits are designed to grind through hard materials without cracking or chipping. They last much longer than standard or carbide-tipped bits and produce the cleanest holes.
Can I Drill Porcelain Tile Without Water?
It’s not recommended. Drilling porcelain generates a lot of heat. Water cooling keeps the drill bit and tile from overheating, which can cause cracks. Always use a spray bottle, sponge, or water feed to keep the area cool.
How Can I Prevent The Drill Bit From Slipping?
Place masking tape over the spot where you want to drill, or use a drill guide. These give the bit extra grip and prevent it from wandering across the slick tile surface.
Credit: www.youtube.com
Should I Use The Hammer Function On My Drill?
Never use the hammer action when drilling porcelain tile. The percussive force will almost certainly crack or shatter the tile. Use a standard rotary drill at low speed for the safest results.
What Do I Do If The Tile Cracks While Drilling?
For small cracks, you can fill them with clear epoxy or grout if they’re hidden. For larger cracks or chips, the best solution is to replace the tile. Trying to patch badly damaged tiles rarely works in the long term.
Drilling into porcelain tile may seem daunting, but with the right approach, it becomes a manageable and even satisfying project. Always use proper tools, take your time, and remember that patience is your best friend. For more in-depth information and professional advice, check out this helpful resource from Family Handyman. With these tips, you’ll be able to drill clean, precise holes in porcelain tile—without fear or frustration.