Hand sharpening a drill bit is a valuable skill, especially for those who work with tools regularly. Many people replace dull bits, but sharpening can save both time and money. It also lets you get the precise cutting edge you want.
While sharpening a drill bit may seem difficult at first, with the right steps and understanding, anyone can master this practical task. This article will guide you through every part of hand sharpening a drill bit, from understanding its anatomy to using a bench grinder, and will answer common questions people have.
Why Sharpen Drill Bits By Hand?
Drill bits dull quickly with regular use, especially on hard materials like steel or concrete. Buying new bits often is costly, and factory-sharpened bits don’t always suit every drilling situation. By learning to sharpen your own bits, you get:
- Extended bit life: Less money spent on replacements.
- Better performance: A sharp bit drills cleaner, faster holes.
- More control: You can adjust the bit’s angle for different materials.
- Less waste: Fewer dull bits end up in the trash.
Many professionals hand sharpen as a routine part of their workshop practice. It also builds a deeper understanding of the tools you use every day.
Understanding Drill Bit Anatomy
Before you start sharpening, you need to know the basic parts of a twist drill bit. This makes it easier to recognize which areas need work and how to keep the correct angles.
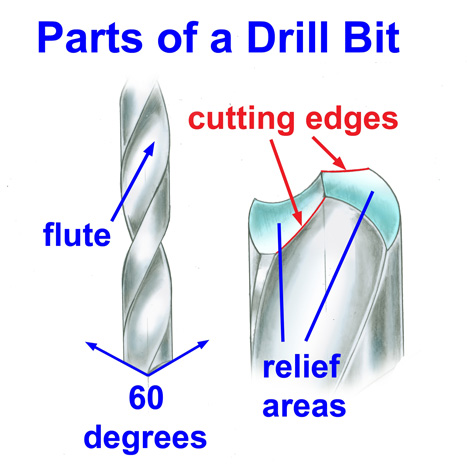
- Point: The very tip where the two cutting edges meet.
- Cutting Edges (Lips): The sharp edges that do the actual cutting.
- Chisel Edge (Web): The center area between the lips; this pushes material aside.
- Flutes: Spiral grooves that help remove chips from the hole.
- Land: The narrow surface along the edge of the flute.
A good sharpening job focuses on the point and the lips. The goal is to make these areas sharp and balanced.
Tools And Materials Needed
To sharpen a drill bit by hand, you need some basic tools. Most people use a bench grinder, but it’s possible with other grinding tools. Here’s what you’ll need:
- Bench Grinder: A standard bench grinder with a medium or fine grit wheel is ideal.
- Safety Glasses: Protects your eyes from sparks and grit.
- Gloves: Optional, but can help prevent burns from hot bits.
- Cool Water or Oil: Used to dip the bit and prevent overheating.
- Permanent Marker: To highlight the cutting edge for better visibility (optional).
- Cloth or Rag: For cleaning off oil, water, or metal filings.
A bench grinder is the most common choice. Hand files are rarely used for twist drills, as the steel is very hard.
Safety Precautions
Grinding metal can be dangerous if not done carefully. Always remember:
- Wear safety glasses to protect your eyes from flying sparks and fragments.
- Remove any loose clothing or jewelry that could catch in the wheel.
- Keep your hands away from the spinning grinder.
- Work in a well-ventilated area to avoid breathing dust.
- Use water or oil to cool the bit and prevent burns or damage.
Never rush the process. Going slow helps you keep control and avoid mistakes.
How To Hand Sharpen A Drill Bit: Step-by-step
Sharpening a drill bit by hand is all about patience and technique. Here’s a clear, detailed guide to get you started.
1. Examine The Bit
First, look at the bit under good light. Check for:
- Dull lips: The cutting edges will look rounded or shiny.
- Chipped or broken tips: These must be ground away.
- Uneven length: Both lips must be the same length for a straight hole.
If you’re not sure which part is the cutting edge, use a permanent marker to color the tip. The marker will grind away as you sharpen, making it easy to see your progress.
2. Set Up The Grinder
A steady, properly adjusted grinder is key.
- Wheel choice: Medium or fine grit is best (60–100 grit).
- Rest position: The tool rest should be just below the center of the wheel.
- Wheel condition: Check for cracks or damage.
- Light: Use a lamp to illuminate your work area.
Make sure there’s a cup of water nearby for cooling.
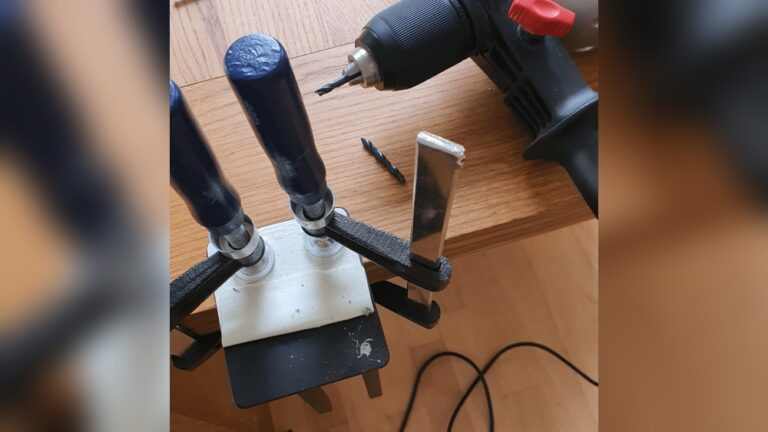
3. Hold The Bit Correctly
Hold the drill bit in your dominant hand, gripping it firmly but not tightly. Your thumb and forefinger should be near the tip, with the shank resting against your palm. Your other hand supports and steadies the shank.
Tip: Many beginners grip too far back. This makes it hard to control the sharpening angle.
4. Set The Correct Angle
The most important part of sharpening is the point angle. Most twist bits are ground to a 118-degree angle. Some are steeper (135 degrees) for harder materials.
- Imagine the tip as a triangle.
- The two faces should be symmetrical.
- Each lip must be the same length and angle.
If you have a protractor or angle guide, use it to check your work. With practice, you’ll learn to judge the angle by eye.
5. Begin Grinding
Touch the cutting edge to the grinder wheel lightly. Move the bit so the lip is flat against the wheel.
- Keep the correct angle as you grind.
- Apply only gentle pressure.
- Use a smooth, controlled motion.
- Rotate the bit slightly as you grind to shape the lip evenly.
Grind for one or two seconds, then remove the bit and cool it in water. Repeat as needed.
6. Grind The Other Side
Now turn the bit 180 degrees and repeat the process on the other lip.
- Both lips should have the same length and angle.
- The point should be centered.
- Alternate sides every few seconds to keep both lips even.
If one side is longer, the bit will “walk” when drilling. A centered point drills straight.
7. Check Your Progress
After a few passes, inspect the bit:
- Are both lips the same length?
- Is the point angle correct?
- Are the edges sharp and free of chips?
- Is the web (chisel edge) narrow but present?
Use a magnifying glass if needed. If one side is off, correct it with light, careful grinding.
8. Reduce The Web (optional)
If you want a sharper, easier-starting bit, thin the web at the tip. This takes practice, but makes drilling faster with less pressure.
To do this:
- Hold the bit at a slightly steeper angle.
- Lightly grind the center web, making it thinner.
- Do not remove too much or the bit will break easily.
Web thinning is common for bits used on hard metals.
9. Final Test
After sharpening, try drilling a test hole in scrap material.
- The bit should cut cleanly and quickly.
- Chips should come out smoothly.
- If the bit squeaks or wanders, check the lip length and angle again.
If needed, repeat the process for finer adjustment.
Common Mistakes And How To Avoid Them
Many beginners make the same errors when sharpening drill bits. Here’s what to watch out for:
- Uneven lips: This causes the bit to wobble. Always check both sides after each grind.
- Overheating: If the bit turns blue, it’s too hot. Dip it in water frequently.
- Wrong angle: Too flat a point won’t cut well; too steep will dull quickly.
- Too much pressure: Let the grinder do the work. Heavy pressure removes too much metal and causes burns.
- Not thinning the web: A thick web makes starting the hole difficult.
Practice on old or broken bits first. As your skill grows, you’ll get better results and waste fewer bits.

Credit: www.youtube.com
Sharpening Different Types Of Drill Bits
Not all drill bits are the same. Here’s how sharpening differs for some common types.
High-speed Steel (hss) Bits
These are the most common drill bits for metal and wood. The process above works perfectly for HSS bits. Just avoid overheating, which can reduce hardness.
Masonry Bits
Masonry bits have a carbide tip. Do not use a regular grinder for these, as carbide requires a diamond wheel. Most people replace rather than sharpen masonry bits, but it is possible with the right tools.
Brad Point And Spade Bits
Brad point bits have a sharp center spur and side cutting edges. Sharpen the point and wings carefully with a small file or diamond stone. Spade bits can be touched up with a flat file.
Cobalt Bits
Cobalt bits are harder and more heat-resistant. They can be sharpened on a regular grinder, but you must dip them in water more often to avoid overheating.
Improving Your Sharpening Skills
Hand sharpening is mostly about practice. Here are some ways to speed up your learning:
- Practice on old bits: Don’t start with your best set.
- Use a permanent marker to track your grinding.
- Test sharpened bits on scrap metal or wood.
- Watch the sparks: Short, bright sparks mean you’re grinding at the cutting edge.
- Compare your results to a new bit for reference.
Many find it helpful to keep a correctly sharpened bit on hand as a visual guide.
When To Replace Instead Of Sharpen
While sharpening can bring most bits back to life, some are beyond repair:
- Deep cracks in the steel
- Severely bent bits
- Bits ground too short or thin
- Broken carbide tips (on masonry bits)
In these cases, it’s safer and more effective to replace the bit.
Hand Sharpening Vs. Drill Bit Sharpening Jigs
Some people use sharpening jigs or specialized machines. These tools can be helpful, but they don’t replace the flexibility of hand sharpening.
| Hand Sharpening | Sharpening Jig |
|---|---|
| Low cost, no extra tools needed | More expensive, requires setup |
| Faster for single bits or quick touch-ups | Good for large batches or perfect angles |
| Flexible for custom angles | Fixed angles, less flexibility |
| Requires skill and practice | Easier for beginners |
If you sharpen bits often, consider a jig. But for most DIYers and professionals, hand sharpening is more versatile and satisfying.

Credit: www.instructables.com
Drill Bit Point Angles: Which To Choose?
The point angle controls how a drill bit cuts. Choosing the right angle makes a big difference.
| Material | Recommended Point Angle | Notes |
|---|---|---|
| Softwood | 90°–118° | Faster drilling, less chip clogging |
| Hardwood | 118°–135° | Reduces burning, lasts longer |
| Aluminum | 118° | Standard angle works well |
| Steel/Iron | 118°–135° | Steeper angle for hard metals |
| Plastic | 90°–118° | Prevents melting |
Most general-purpose bits use 118°. For hard metals, a 135° split point is best. If you work with many materials, learn to grind different angles as needed.
Practical Tips For Better Results
Even small changes in technique can improve your sharpening results.
- Keep the bit cool: Dip in water every few seconds.
- Use a light touch: Heavy pressure removes too much metal.
- Check symmetry often: Uneven lips make drilling difficult.
- Sharpen before the bit gets very dull: Regular touch-ups are easier than fixing a badly damaged tip.
- Store sharpened bits properly: To keep them sharp, store bits in a case or rack.
A common mistake is waiting too long to sharpen. Regular maintenance is quicker and keeps your bits ready for any job.
How To Sharpen Without A Bench Grinder
If you don’t have a bench grinder, it’s still possible to sharpen a drill bit by hand, but it’s more challenging.
- Use a diamond sharpening stone or file.
- Clamp the bit in a vise for stability.
- Hold the stone at the correct angle and stroke across the lip.
- Work both sides evenly, checking the point and lips for symmetry.
This method is slower and best for small bits or touch-ups, not major repairs.
Signs Of A Well-sharpened Drill Bit
How do you know if you’ve done a good job? Look for these features:
- Sharp lips: The edges are crisp, not rounded.
- Centered point: Both lips are the same length.
- Correct angle: Matches the job material.
- Thin web (optional): For easier starts.
- Smooth finish: No gouges or burns.
A well-sharpened bit will start cutting immediately and produce clean, continuous chips.
Credit: www.gia.edu
Real-world Example: Saving A Set Of Bits
A machinist named Alex regularly sharpens bits by hand. He bought a set of high-speed steel bits five years ago and still uses the same set. By sharpening dull bits every month, Alex estimates he saves $50–$100 a year. He also finds that he drills faster and with fewer mistakes, especially when working with stainless steel.
This real-world example shows the value of learning to sharpen your own drill bits.
Troubleshooting: If Your Sharpened Bit Isn’t Working
Sometimes, even after sharpening, a bit still struggles. Here’s what to check:
- Bit isn’t cutting: Edges may not be sharp enough. Try grinding at a slightly steeper angle.
- Bit “walks” on the work: Lips are uneven. Double-check both sides.
- Bit burns the material: Too much pressure or the point angle is too flat.
- Bit breaks easily: The web is too thin or the steel is overheated.
- Bit makes squealing noise: Lubricate the work or check for a dull edge.
With practice, you’ll spot these issues quickly and know how to correct them.
Environmental Impact: Why Sharpening Matters
Sharpening drill bits isn’t just about saving money. It’s also environmentally friendly. Manufacturing a single twist drill bit uses energy, water, and metal. By extending the life of your bits, you reduce waste and the need for new materials.
The U.S. Environmental Protection Agency suggests tool maintenance as a key way to reduce resource use. You can read more about sustainable tool habits at EPA Sustainable Materials Management.
Hand Sharpening Drill Bits: A Quick Comparison
To sum up, here’s how hand sharpening compares to other methods.
| Method | Cost | Skill Needed | Speed | Flexibility |
|---|---|---|---|---|
| Hand Sharpening | Low | Medium-High | Fast (with practice) | High |
| Sharpening Jig | Medium | Low-Medium | Medium | Medium |
| Replacement | High | None | Fast | None |
Hand sharpening is the best balance of cost, skill, and flexibility for most people.
Frequently Asked Questions
What Angle Should I Sharpen My Drill Bit To?
Most general-purpose drill bits are sharpened to a 118-degree point angle. For drilling hard metals like stainless steel, use a 135-degree angle for better performance. The angle is measured between the two cutting lips.
How Do I Know If My Drill Bit Is Sharp Enough?
A sharp drill bit will have crisp, shiny edges and a point that easily scratches metal. When drilling, it should produce clean chips and not squeal or burn the material.
Can I Sharpen Small Drill Bits By Hand?
Yes, but it takes patience. For bits smaller than 3mm, use a fine stone or diamond file and work carefully. Small bits heat up and wear down quickly, so use a light touch.
Is It Safe To Use A Bench Grinder For Sharpening?
A bench grinder is safe if you follow precautions: wear safety glasses, keep your hands clear, and dip the bit in water often to avoid overheating. Always check the grinder wheel for cracks before starting.
What If My Drill Bit Keeps Breaking After Sharpening?
Breaking usually means the web is too thin or the bit was overheated during grinding. Try grinding at a less aggressive angle and dip in water more often. If the bit is very short, it may be time to replace it.
Hand sharpening your own drill bits is a practical, satisfying skill that pays off for any DIYer or professional. With patience and practice, you can save money, work faster, and gain a deeper understanding of your tools. Whether you need a fresh edge for woodworking or a special angle for metal, these steps will help you get the most from every bit in your toolbox.