Accurate measurement of drill bit length is a critical yet often overlooked aspect of both professional machining and everyday DIY projects. Whether you’re a seasoned machinist, an engineer, a woodworker, or a hobbyist, understanding how to measure drill bit length ensures precision, safety, and optimal tool performance. Improper measurement can result in costly errors, reduced tool life, and project failures. Yet, with the right techniques and tools, anyone can reliably measure drill bit length and select the perfect bit for any job.
The process isn’t as simple as grabbing a ruler and eyeballing the length. Different types of drill bits, such as twist bits, spade bits, and masonry bits, each have unique features that affect how length is defined and measured. Additionally, manufacturers may use varying standards, and industry expectations for measurement can shift based on application, whether you’re drilling wood, metal, or concrete.
This comprehensive guide explores the essential methods, tools, and tips for accurately measuring drill bit length, illustrated with real-world examples, data comparisons, and professional insights.
Key Takeaways
- Drill bit length affects drilling depth, accuracy, and tool compatibility.
- Measurement standards differ for various bit types, so always identify the correct reference points.
- Essential tools for measuring include calipers, tape measures, depth gauges, and bit sizing charts.
- Regularly measuring and tracking bit length helps monitor tool wear and maintain project quality.
- Mistakes in measurement can lead to material waste, equipment damage, or project delays.
- Understanding manufacturer specifications is critical, consult official guides when in doubt.

Credit: www.longchengtools.com
Understanding Drill Bit Anatomy And Length Terminology
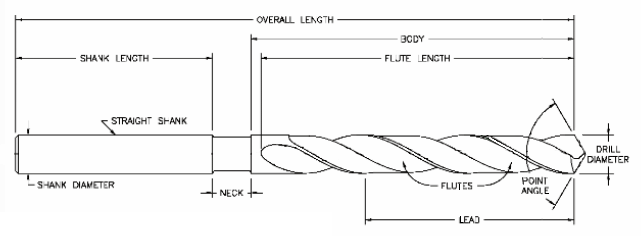
To measure drill bit length accurately, you must first understand the anatomy of a drill bit and the common terms used in measurement.
Key Parts Of A Drill Bit
- Shank: The end that fits into the drill’s chuck.
- Flute: The helical grooves that remove chips and debris.
- Web: The core section running along the bit’s axis.
- Point: The tip that initiates the cut.
- Overall Length: The total end-to-end length, including shank and point.
- Flute Length: Length of the cutting flute, excluding the shank.
- Usable Length: The maximum depth the bit can drill, sometimes less than flute length.
Measurement Standards
- Overall Length (OAL): The distance from the tip of the point to the end of the shank.
- Flute Length: Measured from the tip to the end of the spiral flute.
- Working Length: The maximum depth the bit can be used for, usually slightly less than flute length for safety.
Example: On a standard twist drill, the overall length might be 4 inches, the flute length 2.5 inches, and the usable/working length 2.3 inches.
Why Terminology Matters
Confusion over these terms often leads to mistakes when ordering or using drill bits. For instance, a bit labeled as “6-inch” may refer to overall or flute length, depending on the manufacturer. Always verify which measurement is specified in product listings or technical datasheets.

Credit: www.sinodrills.com
Tools And Equipment For Measuring Drill Bit Length
Choosing the right measurement tool is essential for accuracy, especially when dealing with bits of varying sizes and shapes.
Calipers
Calipers (digital or analog) are ideal for precise measurement. They provide accuracy down to 0.01 mm or 0.001 inch and are suitable for bits up to 6 inches.
Pro Tip: Use calipers to measure both the overall length and flute length by aligning one jaw at the tip and the other at the desired endpoint.
Tape Measure Or Ruler
For longer or larger bits, a tape measure or steel ruler works well. However, accuracy decreases for small bits or when measuring the flute.
Warning: Avoid using flexible tape measures on short or small bits, as they may introduce error.
Depth Gauge
A depth gauge allows you to measure the maximum usable drilling depth, especially useful when you need to replicate hole depth exactly.
Bit Sizing Charts
Bit sizing charts help convert between metric and imperial units and match drill bits to their intended applications.
Comparison Table: Measurement Tools
| Tool | Best For | Accuracy | Range | Limitations |
|---|---|---|---|---|
| Calipers | Small to medium bits, precise measurement | High (0.01mm/0.001in) | 0, 6 inches | Limited to shorter bits |
| Tape Measure/Ruler | Long bits, quick checks | Moderate (0.5mm/1/32in) | Up to 24 inches | Low precision for small bits |
| Depth Gauge | Drilling depth, repeat tasks | High (0.1mm/0.005in) | 0, 12 inches | Measures only depth, not overall |
Step-by-step Guide: Measuring Drill Bit Length Accurately
Following a systematic approach ensures reliable and repeatable measurements.
Step 1: Identify The Bit Type And Reference Points
- For twist bits, measure from the point tip to the shank end (overall), or from the tip to the flute end (flute length).
- For spade bits, measure from the center tip to the end of the shank.
- For masonry bits, measure from the carbide tip to the end of the shank.
Pro Tip: Always clean the bit of debris before measuring for best accuracy.
Step 2: Select The Appropriate Tool
- Use calipers for bits less than 6 inches.
- Use a steel ruler for longer bits.
- For depth-critical applications, use a depth gauge.
Step 3: Measure Overall Length
- Place the bit on a flat, stable surface.
- Align the measuring tool at the tip and extend to the shank’s end.
- Read and record the measurement.
Step 4: Measure Flute And Usable Length
- Identify the start and end of the flute.
- Position the measuring tool along the flute’s axis.
- Record the measurement, noting any wear or rounding at the flute’s end.
Step 5: Note Special Features
- Some bits (e.g., step drills, auger bits) require measuring each step or cutting surface separately.
- For bits with replaceable tips, measure only the body if the tip is missing.
Real-world Example: Measuring A Masonry Drill Bit
When measuring a 10-inch masonry bit:
- The overall length is 10 inches (tip to shank end).
- The flute length is 7 inches (tip to flute end).
- The maximum usable length is 6.5 inches (allowing for chuck clamping).
Example: In my experience, I once used a caliper to measure a worn 3/8-inch twist bit. The overall length was 4.1 inches, but the flute was down to 2 inches, indicating significant wear and the need for replacement.
Credit: gtse.co.uk
Measuring Drill Bit Length For Different Bit Types
Different bit designs require unique measurement considerations.
Twist Drill Bits
- Standard Method: Measure overall and flute length as described above.
- Tip Geometry: Split points or pilot points may affect the starting point for measurement.
Spade Bits
- Width: Always measure at the widest point of the blade.
- Length: From the center tip to the shank’s end.
Forstner Bits
- Body Length: Exclude the shank; focus on the cutting cylinder.
- Cutting Depth: The cylinder’s height limits maximum drilling depth.
Masonry & Sds Bits
- Carbide Tip: Start at the cutting tip, not the body.
- Usable Length: Allow for the extra length needed for hammer action.
Auger Bits
- Spur to Shank: Measure from the cutting spur to the shank end.
- Flute Measurement: Useful for determining chip clearance.
Step Drill Bits
- Each Step: Measure the length to each step edge.
- Overall Length: From the tip to the shank end.
Comparison Table: Bit Types And Measurement Points
| Bit Type | Overall Length | Flute/Body Length | Special Notes |
|---|---|---|---|
| Twist Bit | Tip to shank end | Tip to flute end | Check for worn flutes |
| Spade Bit | Tip to shank end | Tip to blade end | Measure width at blade |
| Forstner Bit | Tip to shank end | Cylinder height | Exclude shank for cut depth |
| Masonry Bit | Carbide tip to shank end | Tip to flute end | Allow for hammer action |
| Step Bit | Tip to shank end | Each step edge | Record each step’s size |
Common Mistakes And How To Avoid Them
Even experienced users can make measurement errors that result in poor outcomes.
Mistake 1: Measuring The Wrong Reference Points
- Confusing overall length with flute or working length.
- Not accounting for worn or damaged tips.
Mistake 2: Ignoring Manufacturer Specifications
- Relying on generic measurements instead of checking the product datasheet.
- Overlooking metric/imperial conversion errors.
Mistake 3: Using Inaccurate Tools
- Using plastic rulers or flexible tapes for precision work.
- Skipping calibration of measurement tools.
Mistake 4: Not Considering Chuck Engagement
- Failing to subtract the portion of the bit that will be gripped by the chuck, leading to overestimating usable depth.
Mistake 5: Neglecting Bit Wear
- Measuring new vs. used bits without factoring in wear at the point or flutes.
Example: A woodworking shop ordered “6-inch” bits, assuming usable drilling depth would be 6 inches. The actual flute length was only 3.5 inches, resulting in incomplete holes and wasted material.
Industry Standards And Manufacturer Specifications
Understanding and referencing industry standards helps ensure consistency and safety.
Ansi And Iso Standards
- ANSI B94.11M: Defines dimensions for twist drills in the US.
- ISO 235: International standard for twist drill sizes and lengths.
These standards specify how overall and flute lengths are to be measured, providing reference tables for common bit sizes.
Manufacturer Datasheets
Major manufacturers such as DeWalt, Bosch, and Milwaukee publish technical datasheets with exact dimensions and application guidelines.
- Always consult the datasheet for:
- Overall length
- Flute length
- Shank diameter
- Recommended usage
Conversion Table: Common Inch-to-millimeter Drill Bit Lengths
| Inches (in) | Millimeters (mm) | Common Bit Length Example |
|---|---|---|
| 2.00 | 50.8 | Short twist bit |
| 4.00 | 101.6 | Standard twist bit |
| 6.00 | 152.4 | Long twist bit |
| 12.00 | 304.8 | Extra long masonry bit |
Pro Tip: Always Check Both The Overall Length And Flute Length In The Datasheet Before Ordering Or Using A Bit For A Depth-critical Application.
Practical Applications And Real-world Examples
Measuring drill bit length isn’t just theoretical, it directly impacts project outcomes in many industries.
Case Study 1: Precision Machining
In precision metalworking, machinists often need to drill to exact depths. Using a depth gauge, they measure both the drill bit and the workpiece to ensure the hole doesn’t exceed specifications, which could compromise part integrity.
Case Study 2: Construction And Masonry
A contractor using SDS masonry bits for concrete anchors must know the exact usable length to ensure proper anchor embedment. Measuring from the carbide tip to the flute end, they select a bit that guarantees the hole meets code requirements.
Case Study 3: Woodworking And Cabinetry
Cabinetmakers often work with long twist bits to drill through thick hardwoods. By measuring both the overall and flute lengths, they prevent drilling too deep or bottoming out, which could damage the workpiece or the bit.
Example: In My Experience, When Installing Electrical Wiring Through Wooden Studs, I Selected A 12-inch Auger Bit. Measuring The Flute Length Ensured I Could Drill Through Multiple Studs Without Binding Or Overheating, Avoiding Wasted Time And Costly Mistakes.
Tips For Maintaining Measurement Accuracy
Ensuring accurate measurements is not a one-time task; it requires ongoing attention and best practices.
Regularly Calibrate Your Tools
- Check your calipers, rulers, and gauges against a known standard.
- Replace or recalibrate tools that show signs of wear or damage.
Document Measurements
- Keep a log of bit lengths, especially for frequently used or expensive bits.
- Mark shortened or worn bits to avoid confusion.
Store Bits Properly
- Use labeled racks or cases to separate bits by size and length.
- Avoid tossing bits into toolboxes, which can cause damage and make accurate measurement difficult.
Replace Worn Bits Promptly
- When flute length or overall length is reduced by wear, retire the bit.
- Dull or shortened bits can overheat, break, or cause poor-quality holes.
Example: A Maintenance Team Used Color-coded Racks To Organize Bits By Length And Application, Reducing Errors And Increasing Tool Life.
Advanced Measurement Techniques For Specialized Bits
Some bits require advanced or custom measurement techniques, especially in industrial settings.
Measuring Step And Countersink Bits
- Use calipers to measure from the tip to each step edge.
- For countersink bits, measure the angle and depth of the cutting face.
Using Optical Comparators
- In high-precision environments, optical comparators can project the silhouette of a drill bit onto a screen, allowing for exact measurement of complex geometries.
3d Scanning And Digital Tools
- 3D scanners can capture the exact geometry of specialty bits, useful for reverse engineering or quality control.
- Digital calipers and micrometers with data output can log measurements directly to a computer.
Consulting Manufacturer Or Industry Guides
- For highly specialized bits (e.g., gun drills, reamers), always follow the manufacturer’s recommended measurement procedure.
Example: Aerospace manufacturers often use laser measurement systems to verify bit dimensions before critical operations, ensuring absolute precision.
Frequently Asked Questions
What Is The Difference Between Overall Length And Flute Length In A Drill Bit?
Overall length is the total end-to-end distance of the drill bit, including the shank and the tip. Flute length refers only to the length of the spiral cutting portion, from the tip to where the spiral ends. Flute length is usually less than overall length and determines the maximum depth you can drill in one pass.
How Does Bit Length Affect Drilling Performance?
Longer drill bits can reach deeper holes but may be more prone to flexing, vibration, or breakage. Shorter bits provide more stability and accuracy. Always match the bit length to the required hole depth and material; using the wrong length can cause poor hole quality or tool failure.
Why Do Some Manufacturers List Different Lengths For The Same Bit Size?
Manufacturers may use different standards or measurement points (overall, flute, working length). Always check the technical datasheet or product description for clarification, and use industry standards (such as ANSI or ISO) when comparing bits from different brands.
How Can I Measure A Drill Bit If The Tip Is Broken Or Worn?
If the tip is damaged, measure from the remaining point to the end of the shank for overall length, but recognize that the bit’s usable length is now shorter. For critical applications, it’s best to replace damaged bits, as accuracy and cutting performance will be compromised.
Is It Necessary To Measure Drill Bit Length After Each Use?
It’s not necessary after every use, but it’s good practice to check length and condition periodically, especially for bits used in precision work or subject to heavy wear. This helps you track tool life, maintain quality, and avoid unexpected failures during projects.
Accurate measurement of drill bit length is a cornerstone of safe, precise, and efficient drilling operations. By understanding bit anatomy, using the right tools, and following industry standards, you ensure your projects run smoothly and your tools last longer. Invest in proper measurement habits and consult reliable sources like manufacturer datasheets and industry standards to achieve the best results. For further reading, explore resources such as Wikipedia: Drill Bit and official manufacturer guides such as Bosch Tools. With these skills and resources, you’ll make more informed decisions and achieve professional-grade outcomes in every drilling task.