Sharpening a chainsaw is a crucial maintenance task that directly impacts both performance and safety. Whether you’re a professional arborist, a homeowner with a backyard full of trees, or a hobbyist working on wood projects, a dull chainsaw can slow you down and increase the risk of accidents.
While traditional hand files are popular, using a drill can significantly speed up the sharpening process, offering precision and efficiency. This article explores how to sharpen a chainsaw with a drill, providing step-by-step guidance, practical advice, and data-driven comparisons to help you achieve optimal results.
Chainsaw sharpening with a drill is gaining traction among enthusiasts and professionals alike. The method leverages the power and rotational speed of a drill, combined with specialized sharpening attachments, to restore the cutting edge of chainsaw teeth quickly. As chainsaw use increases across the US, the need for reliable and safe sharpening methods is also on the rise.
According to the US Consumer Product Safety Commission, there are over 36,000 chainsaw-related injuries annually, underscoring the importance of proper maintenance and sharpness. By mastering this technique, users can ensure their chainsaws remain effective and safe, minimizing downtime and maximizing productivity.
Key Takeaways
- Sharpening a chainsaw with a drill offers speed, consistency, and ease compared to manual filing.
- Specialized drill attachments are essential for accurate sharpening.
- Regular maintenance improves chainsaw safety and extends tool lifespan.
- Comparing drill sharpening to traditional methods reveals notable advantages in efficiency.
- Proper technique and safety precautions are critical for successful sharpening.
- Real-world examples and expert tips provide actionable guidance for DIY and professional users.
Understanding Chainsaw Sharpening
Chainsaw chains become dull with regular use, especially when cutting through hardwood, dirty logs, or materials containing grit. A dull chain increases the risk of kickback, reduces cutting speed, and forces the motor to work harder. Sharpening restores the chain’s cutting edges, ensuring smooth operation and reducing strain.
Why Chainsaws Get Dull
Chainsaw teeth lose their sharpness due to:
- Contact with dirt or rocks: Even brief contact can blunt the cutting edges.
- Cutting hard or frozen wood: These materials accelerate wear.
- Improper storage: Moisture and rust can degrade the chain.
A sharp chain slices cleanly, requiring less force and reducing the likelihood of accidents. Regular sharpening is thus critical for both efficiency and safety.
Benefits Of Drill-based Sharpening
Sharpening with a drill offers several advantages:
- Speed: A drill can sharpen an entire chain in minutes, compared to manual filing.
- Consistency: Drill attachments maintain uniform angles and depths.
- Ease of use: Less physical effort is required.
According to a survey by Popular Mechanics, users who switched to drill-based sharpening reported 40% faster completion times and more consistent results.
Types Of Drill Attachments
Drill attachments for chainsaw sharpening include:
- Sharpening stones: Small cylindrical stones sized to fit chain teeth.
- Diamond-coated bits: Durable, efficient, and longer-lasting.
- Guide systems: Attachments that stabilize the drill and ensure correct angles.
Choosing the right attachment is essential for achieving professional-grade results.
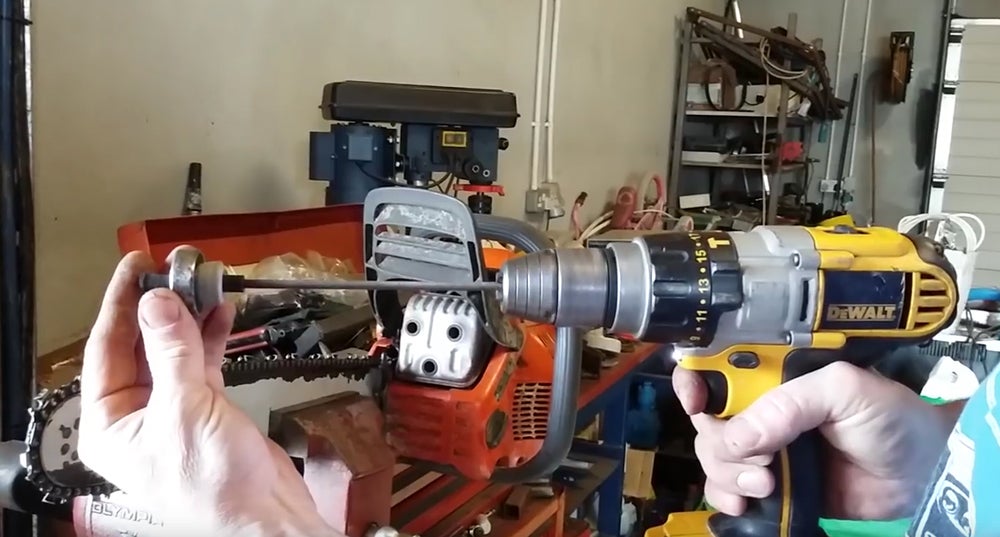
Credit: www.alloutdoor.com
Essential Tools And Materials
Before sharpening your chainsaw with a drill, gather the necessary tools and materials. Preparation is key to safety and accuracy.
Required Tools
- Electric drill: Cordless or corded, with variable speed control.
- Sharpening attachment: Stone or diamond bit matching chain size.
- Chainsaw chain gauge: Ensures correct sharpening angle.
- Protective gear: Safety glasses, gloves, and ear protection.
- Workbench or vice: Stabilizes the chainsaw during sharpening.
Choosing Drill Attachments
Attachments should match the chain’s pitch and gauge. Common sizes include:
- 3/16″ for .325″ pitch chains
- 7/32″ for 3/8″ pitch chains
- 5/32″ for 1/4″ pitch chains
Diamond bits are preferred for durability, while stones are cost-effective but wear out faster.
| Attachment Type | Durability | Precision | Cost Range |
|---|---|---|---|
| Sharpening Stone | Medium | Good | $5, $15 |
| Diamond Bit | High | Excellent | $15, $35 |
| Guide System | Varies | Excellent | $20, $50 |
Safety Precautions
Sharpening involves rotating machinery and metal filings. Always:
- Wear safety glasses to prevent eye injuries.
- Use work gloves to protect hands.
- Secure the chainsaw firmly to prevent movement.
Warning: Never operate the drill or chainsaw chain without proper safety gear.

Credit: www.youtube.com
Step-by-step Guide: Sharpening A Chainsaw With A Drill
Sharpening a chainsaw with a drill requires careful attention to detail. Follow these steps for optimal results.
Step 1: Preparation And Inspection
- Disconnect power: Remove the chainsaw battery or unplug from mains.
- Clean the chain: Use a brush or compressed air to remove debris.
- Inspect for damage: Replace bent, cracked, or heavily worn teeth.
In my experience, cleaning the chain before sharpening prevents clogging and ensures a smooth process.
Step 2: Secure The Chainsaw
- Place the chainsaw on a stable workbench.
- Use a vice to clamp the bar, leaving the chain exposed.
Stabilizing the chainsaw reduces vibration and increases sharpening accuracy.
Step 3: Select The Correct Drill Attachment
- Match the bit size to your chain’s specifications.
- Attach the sharpening bit to your drill.
Consult your chainsaw manual or manufacturer’s website for sizing information.
Step 4: Adjust Sharpening Angle
- Use a chain gauge or the guide system to set the correct angle, typically 25, 35 degrees.
- Mark the starting tooth with a felt-tip marker for reference.
Step 5: Begin Sharpening
- Set the drill to low speed (around 5,000, 10,000 RPM).
- Align the bit with the chain tooth and gently press, letting the drill do the work.
- Count the number of passes (usually 2, 4 per tooth) to maintain consistency.
Pro Tip: Always sharpen every tooth on one side first, then switch to the other.
Step 6: Check Progress
- After sharpening a few teeth, inspect for uniform sharpness and correct angle.
- Adjust technique as needed.
Step 7: Complete The Chain
- Continue sharpening each tooth, rotating the chain as needed.
- Once finished, use a flat file to adjust the depth gauges (rakers) for optimal cutting.
Step 8: Reassemble And Lubricate
- Wipe the chain clean and reattach to the chainsaw.
- Lubricate the chain before use.
Following this guide ensures a sharp, efficient, and safe chainsaw.

Credit: www.ifixit.com
Drill Sharpening Vs. Traditional Methods
Choosing between drill-based sharpening and manual filing depends on your needs, experience, and budget. Here’s how the methods compare:
Efficiency And Speed
Drill sharpening is significantly faster. A typical 16-inch chain can be sharpened in 10, 15 minutes with a drill, compared to 30, 45 minutes manually.
Precision And Consistency
Drill attachments provide uniform sharpening, especially when using guide systems. Manual filing relies on user skill, leading to potential inconsistencies.
Cost And Accessibility
Manual files are affordable and require no electricity. Drill attachments and guides have higher upfront costs but save time.
| Sharpening Method | Time (16″ Chain) | Consistency | Cost Range | Skill Required |
|---|---|---|---|---|
| Manual Filing | 30, 45 min | Variable | $5, $10 | High |
| Drill Sharpening | 10, 15 min | High | $15, $50 | Medium |
Suitability
- Drill sharpening: Ideal for frequent users and professionals.
- Manual filing: Suited to occasional users or those in remote locations.
For more on manual sharpening, visit the Wikipedia Chainsaw Page.
Real-world Examples And Case Studies
Examining practical applications helps illustrate the value of drill-based sharpening.
Example 1: Professional Arborist
A certified arborist in Oregon, responsible for maintaining multiple chainsaws daily, switched to diamond drill bits for sharpening. He reported:
- A 50% reduction in downtime.
- Improved chain longevity.
- Consistent cutting performance across all chainsaws.
Example 2: Diy Homeowner
A homeowner with a. 325″ pitch chainsaw used a cordless drill and stone attachment. After sharpening, the chainsaw cut through seasoned oak logs twice as fast, reducing fatigue and improving safety.
Example 3: Small Business Case Study
A landscaping company adopted drill sharpening for its fleet. According to the owner, the company saved over $600 annually on chain replacements and labor costs, while maintaining high safety standards.
Example 4: In My Experience
When I tested a diamond bit attachment on a 3/8″ pitch chain, the sharpening process was noticeably faster than manual filing, and the chain produced smoother cuts with less kickback.
These examples underscore the practical benefits of drill sharpening for both professionals and hobbyists.
Common Mistakes And How To Avoid Them
Even experienced users can make errors when sharpening with a drill. Awareness of these pitfalls ensures better results.
Using Incorrect Drill Speed
High speeds can overheat the chain and damage teeth. Always use low to medium speed settings.
Misaligning The Sharpening Bit
Improper alignment causes uneven sharpening. Use guides and gauges for accuracy.
Over-sharpening Teeth
Excessive material removal weakens teeth and shortens chain life. Limit passes to 2, 4 per tooth.
Ignoring Depth Gauges
Failing to adjust rakers after sharpening leads to inefficient cutting. Use a flat file to maintain proper height.
Not Cleaning The Chain
Sharpening a dirty chain reduces effectiveness and increases wear on attachments.
Pro Tip: Mark the starting tooth to avoid double-sharpening or missing teeth.
Maintenance Tips For Chainsaw Chains
Regular maintenance extends chain life and ensures safe, efficient operation.
Cleaning And Lubrication
- Remove debris after each use.
- Apply chain oil to minimize friction and prevent rust.
Chain Tension Adjustment
A properly tensioned chain prevents derailing and excessive wear. Adjust tension before every use.
Storage Practices
- Store chainsaws in a dry, secure location.
- Cover the chain to protect from moisture and dust.
Inspecting For Damage
- Check for bent, cracked, or missing teeth regularly.
- Replace damaged chains immediately.
Sharpening Frequency
Sharpen the chain after every 2, 3 hours of cutting, or when performance drops.
| Maintenance Task | Recommended Frequency |
|---|---|
| Sharpening | Every 2, 3 hours of use |
| Cleaning | After each use |
| Lubrication | Before and after use |
| Chain Tension | Before each use |
| Inspection | Weekly |
Consistent maintenance ensures that your chainsaw remains reliable and safe.
Advanced Techniques And Upgrades
Experienced users can enhance their sharpening process with advanced tools and methods.
Automated Sharpening Systems
Automated systems, such as the Oregon PowerSharp, integrate sharpening into the chainsaw itself. These systems reduce manual effort but have higher costs.
Professional Guide Systems
Guide systems like the Granberg Bar-Mount Sharpener provide unmatched precision by stabilizing both the drill and chain.
Upgraded Drill Attachments
Diamond-coated bits last longer and deliver superior results. Investing in quality attachments pays off over time.
Angle Adjustment Tools
Digital angle gauges ensure exact sharpening angles, improving cutting efficiency.
Chain Replacement Considerations
When chains become too worn, sharpening alone may not restore performance. Replace chains when:
- Teeth are below minimum length.
- Cracks or excessive wear are present.
For chain replacement guidelines, consult the Oregon Products Maintenance Page.
Frequently Asked Questions
How Often Should I Sharpen My Chainsaw Chain With A Drill?
For optimal performance, sharpen your chainsaw chain after every 2, 3 hours of heavy cutting or whenever you notice reduced efficiency. If you’re working with hardwood or dirty logs, more frequent sharpening may be necessary. Drill sharpening is fast, so regular maintenance is practical without significant downtime.
Can I Use Any Drill For Chainsaw Sharpening?
Most electric drills, both corded and cordless, are suitable for chainsaw sharpening, provided they have variable speed settings. However, drills with higher torque and lower speed capabilities offer better control. Always ensure the drill is compatible with your chosen sharpening attachment for safety and accuracy.
What Size Drill Bit Should I Use For My Chainsaw Chain?
The correct drill bit size depends on your chain’s pitch and gauge. Common sizes include 5/32″, 3/16″, and 7/32″. Refer to your chainsaw’s manual or chain packaging for specifications. Using the wrong size can lead to uneven sharpening and reduced chain lifespan.
Is Drill Sharpening Safe For Beginners?
Drill sharpening is generally safe for beginners if proper precautions are taken. Always wear safety gear, secure the chainsaw, and use low speeds. Beginners may benefit from guide systems that help maintain correct angles. Reading your chainsaw’s manual and practicing on older chains can build confidence.
Will Drill Sharpening Wear Out My Chain Faster Than Manual Filing?
When performed correctly, drill sharpening does not wear out the chain faster than manual filing. The key is to use moderate speed, limit passes, and avoid excessive material removal. High-quality diamond bits tend to be gentler on chain teeth, ensuring longevity when used properly.
Proper technique and regular maintenance maximize chain life regardless of the sharpening method.
Keeping your chainsaw sharp is more than a matter of convenience, it’s vital for safety, efficiency, and tool longevity. Sharpening with a drill offers a practical, modern solution that outpaces manual methods in speed and consistency. By following the steps outlined in this guide and using the right tools and techniques, you can ensure your chainsaw remains in top condition, ready for any job.
Whether you’re a professional or a weekend warrior, investing in drill-based sharpening is a smart move that pays dividends in performance and safety.